
Update on January 13th, 2020
In the version dated January 1st, 2020, we had a little error in one of the script-files, which activated not only the obfs4 functionality but also uncommented “BridgeRelay 1” in /etc/tor/torrc. This led to conflict and blocked Tor to function. In a revised version, dated January 12th, 2020, we fixed this (and some other minor) bugs (see changelog below)
TorBox Image: v.0.3.0 (12.01.2020) – SHA-256 values
TorBox Menu only: v.0.3.0 (12.01.2020) – SHA-256 values
How to update from v.0.3.0 (01.01.2020) to v.0.3.0 (12.01.2020)?
Because we also switched curl for wget, the update from the previous version to version 0.3.0 (12.01.2020) cannot be done with the update sub-menu. Please proceed as follow (all settings remain unchanged):
- If not already done, go into the countermeasure sub-menu and toggle bridge mode from on to off. This comments out the line “BridgeRelay 1” in /etc/torrc. With the command “less /etc/tor/torrc” in the SSH shell, /etc/tor/torrc can be checked: all lines beginning with “Bridge” must have a # in front.
- Type following commands in the SSH shell:
cd
wget https://www.torbox.ch/data/torbox030-20200112.zip
rm -r torbox
unzip torbox030-20200112.zip
mv torbox030-20200112 torbox
rm torbox030-20200112.zip
cd torbox
./menu
Changelog: v.0.3.0 (01.01.2020) –> v.0.3.0 (12.01.2020)
- New: Added to the “install” folder script and batch files to avoid a “Tor over Tor” situation if TorBox and the Tor Browser are used together. For more information, see here.
- Fixed: Obfs4 functionality because it was broken due to a little error in one of the script-files. The bug resulted in uncommenting the line “BridgeRelay 1” in /etc/tor/torrc, which led to conflict and blocked Tor to function.
- Fixed: Replaced curl with wget in the update script to avoid an error if the link is redirected to another destination.
Original post:
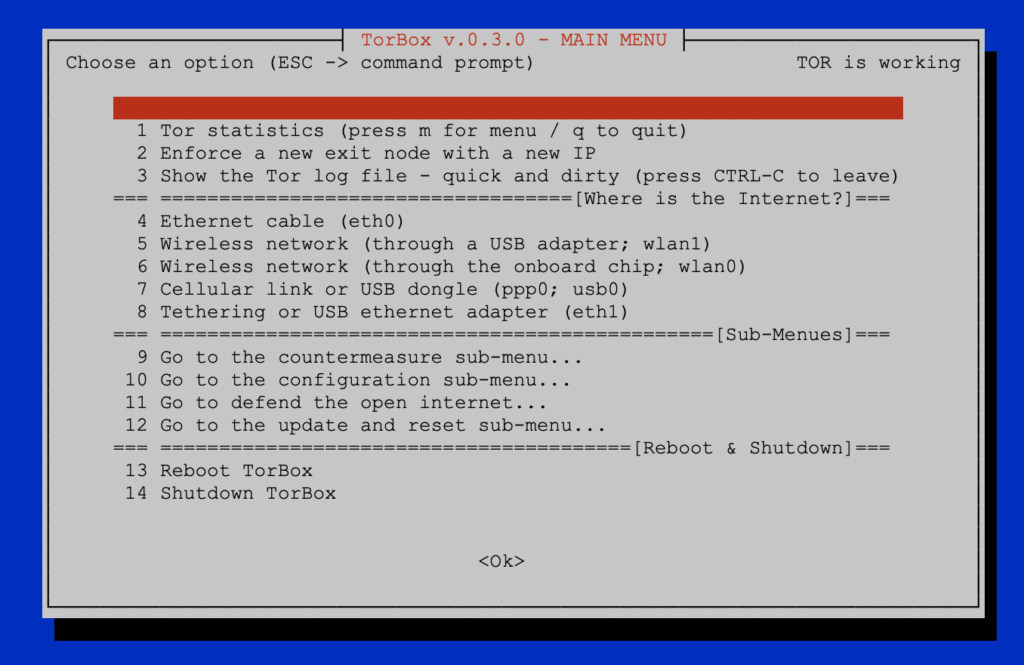
Based on feedback, difficulties with the correct operation of cable-based clients, and the need to offer a greater variety of connection options when connecting to the internet (also for future developments), the main menu of the TorBox was rewritten entirely. We would appreciate feedback so that we can make further improvements and adjustments in the next release (planned for mid-2020).
The idea behind the new main menu is that the user only has to specify where the TorBox gets its internet from. After that, the clients are served via TorBox’s wireless network, and if connected, simultaneously via ethernet cable. Also, other smaller improvements and wishes have been taken into account, which are listed in detail below. These are the corresponding links to download and install the newest version of TorBox (typically, you need only the image file):
Since we also had to update the configuration files, we recommend using the new image rather than updating an existing system. If you need to update your old TorBox, we recommend to replace the old TorBox menu with the new one and then update the configuration files via the update and reset sub-menu entry 6, which overwrites all old configuration files. However, the old files are saved as .bak. For further information, please contact us.
We update the TorBox website over the next weeks. Until then, some information could be outdated and refer to the older version.
Changelog: v.0.2.5 (24.09.2019) –> v.0.3.0 (01.01.2020)
- Update: The system is based on Raspbian “Buster” lite with Linux Kernel 4.19.75 and Tor version 0.4.2.5.
- New: The main menu is completely rewritten. You only have to specify where the TorBox gets its internet from. By default, it establishes a wireless network, which can be accessed by client devices. If available and connected, client devices are served by ethernet cable.
- New: TorBox supports now internet connectivity with the Point-to-Point Protocol (ppp0, for example, for cellular shields/HATs) and/or over USB adapters (usb0).
- New: By default TorBox’s wireless network is established by the onboard chip (wlan0). This can be switched with a USB wireless adapter (wlan1) so that TorBox can access external hotspots on the 5 GHz band, which is probably not supported by a cheap low-powered USB wireless adapter.
- New: The TorBox configuration sub-menu supports now the changing from 2.5 GHz (20 MHz / 40 MHz) to 5 GHz (40 MHz / 80 MHz) and back. Additionally, the WLAN channel to be used can be selected and changed.
- New: We integrated an update sub-menu that also comprises all the reset features, which are now removed from the countermeasures sub-menu.
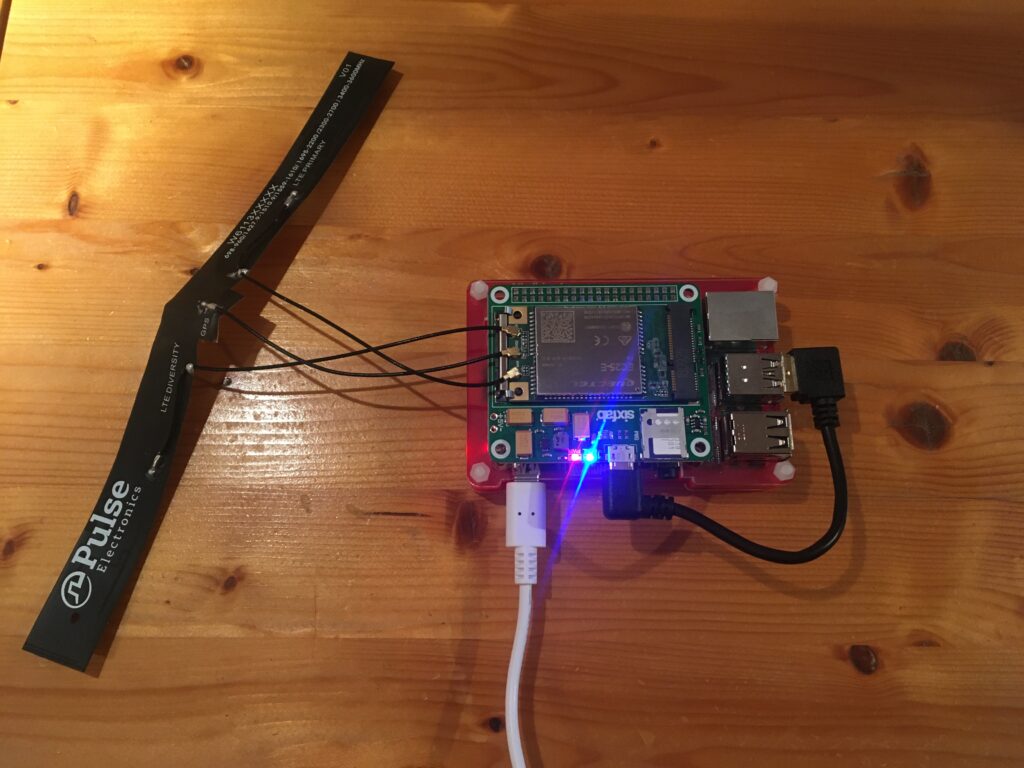
- New: Support for Sixfab Cellular Shields/HATs. The following Sixfab Shields are supported: Raspberry Pi GSM/GPRS Shield, Raspberry Pi 3G-4G/LTE Base Shield V2, Raspberry Pi 3G/4G<E Base HAT, Raspberry Pi Cellular IoT Application Shield, Raspberry Pi Cellular IoT HAT, Raspberry Pi Tracker HAT.
- New: Beginning with this release, we provide to all our files SHA-256 hashes, so that you can verify the integrity of the downloaded files.
- Improved: Cleaned up of the code. and outsourced essential functions into a library. This will help to maintain the code in future releases properly.
- Improved: Setting and changing the WLAN regulatory domain is now more user-friendly.
- Improved: Because we could clean up the main menu, we added an entry to show the Tor log file. Sometimes, especially if you run a bridge relay, Tor needs minutes to start up. Using this menu entry is an easy way to follow the progress on loading.
- Fixed: The gpg key for Torproject’s Debian repository is now fetched more reliably (used in the update script), and additional post-update configurations will prevent the breaking of the bridge relay functionality.
- Experimental: A new script to install TorBox from scratch on a Raspberry Pi with Raspbian light.
- Removed: CABLE MODE– no longer necessary
Your feedback is welcome!!
We hope that this version will please you. However, we are dependent on feedback. It’s not just about fixing bugs and improving usability, but also about supporting additional interfaces and hardware in future releases:
- What do you like?
- What should be improved (and how)?
- What would you like to see next? Which features do you request?
Hello.
What is the method for enabling the “cable client mode” (or whatever the mode for “wifi for interwebs and ethernet for local clients” is called) using adequately powered RPi4 and the newest Torbox030 image with the least amount of user buttpain involved?
Or is that feature currently nerfed?
Or am I nerfed?
Hello.
I just updated the documentation regarding the main menu of TorBox (see here). With TorBox v.0.3.0 there is no separate wired/wireless mode anymore. By default, clients are served wireless. However, if a client is connected via ethernet cable to the TorBox, whether using the onboard or external ethernet adapter, then additionally the TorBox functionality is automagically enabled for that client, too.
TorBox is not working on my pi 3b+ with ethernet connection.
I put the image on a 32gb sd card (etcher,winflashtool,usbit,etc) but when i start the pi the green led is always blinking.
I also tried to write the image on other sd cards and another pi 3b+.always the same problem.
I can connect to the pi with putty, the logs say no connection to tor possible, trying 120secs then giving up.
When i try option 6 putty loses connection and i cannot reconnect until i manually disconnect the power cable of the pi. After that it still not works.
When i try option 4 it says something like: There should be a connection to tor but it is not possible.
My modem gives an ipv4 address to the pi, i have also tried to give it a static ip.not working.
Any suggestions?
Thanks in advance.
I can also connect from a device to the torbox wifi, but it takes very long and as my post suggests it says that i have no internet connection.
Hello Michael
I’m sorry that TorBox does not work for you right away. But with the information provided it, is difficult to determine the cause. Let us try anyway!
After flashing the SD-Card, TorBox’s first boot up can take a little bit longer (up to 5 minutes). This is because the filesystem is expanded to the full 32Gb, and afterward, the system is rebooted. Subsequently, Tor looks for an entry guard, exchange a range of data, and build circuits. This all takes some time. You can monitor the progress of the Tor boot process by selecting menu entry 3 from the main menu. New entries are added automatically. At the end of the loading process, you should see “Bootstrapped 100% (done): Done”, and the TorBox is ready to use. You can exit the log by pressing CTRL-C. By the way, after expanding the filesystem, the green LED stops flickering wildly. However, it still pulsates about every second, because when TorBox is running, the SD card is accessed from time to time, which makes the LED light up. So this is nothing unusual.
If the Tor boot process is not successful, it stucks at some “Bootstrapped xx%” with error messages. This information may help to identify the error. If Tor doesn’t get beyond “Bootstrapped 10%”, Tor won’t reach any relays, and TorBox may not be connected to the Internet or Tor relays may be blocked in your country. In your case, after leaving the main menu with ESC and entering the command “ifconfig” eth0, under “inet” an IPv4 address should be displayed. If this is not the case, the modem has not distributed any via DHCP.
If you get the IPv4 address, but Tor still can’t start, you can try the following measures:
If nothing helps, then download an FTP client that supports SFTP, log into your TorBox, and download the below-mentioned files. Alternatively, connect a USB stick into your TorBox, mount it (most probably something like “sudo mount /dev/sda /mnt”), and copy all the below-mentioned files on it. Then send all files to [email protected]. The files / necessary information are:
Hey can you help me with setup when I do wireles s to wireless setup on wlan1 it just say connect ad gives my ip wicd curse interfece stays on that i dont get anything . When i do Q for quit it just disconects do you have problem in thi version because im loosing my mind over this 😀
Hello
If wlan1 (menu entry 5) doesn’t work, then try wlan0 (menu entry 6). Important: with both menu entry, you always need a USB WiFi adapter! If you don’t get any IP address in the wicd curse interface or if it keeps losing its IP address, this is usually an indication of a power problem (see more about here).
If that doesn’t help, send us an email according to this entry.