TorBox is an easy to use, anonymizing router based on Raspberry Pi, which also runs on Debian and Ubuntu based systems. TorBox can create a separate WiFi that routes the encrypted network data over the Tor network. However, TorBox also supports clients that are connected with a cable. Additionally, TorBox helps to publish data easily and safely through Onion Services. The type of client (desktop, laptop, tablet, mobile, etc.) and operating system on the client don’t matter.
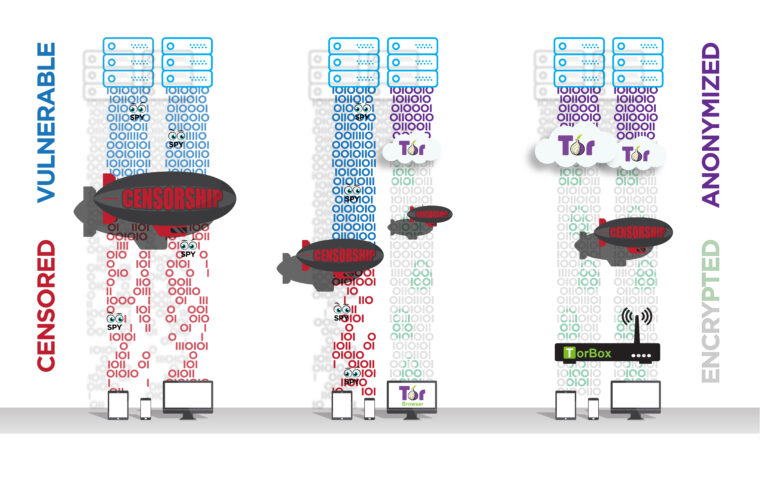
Tor, on which TorBox is based, encrypts your network data from your client to the Tor exit node, overcomes censorship, and anonymizes your data stream. Commonly, Tor is used by the Tor Browser, which facilitates surfing the web or accessing onion services (.onion – Websites). However, there are also other programs using Tor, like the peer-to-peer messenger app Ricochet Refresh, TorBirdy (an extension for Mozilla Thunderbird) and OnionShare. Though wouldn’t it convenient to route all your data through the Tor network, independently from the client, the service, and the program be used?
TorBox accomplishes this by creating a separate WiFi and routing all network data over the Tor network. Also, clients can be connected to a TorBox using an Ethernet cable. The TorBox image file, available here (~1.25 GB), can be run on a low-priced Raspberry Pi.
TorBox can be connected to an Internet router through an Ethernet cable, but it can also be used in connection with another (unsecured) WiFi, even if it has a captive portal.

A word of warning!
Use it at your own risk!
TorBox is ideal for providing additional protection for the entire data stream up to the Tor network and for overcoming censorship. However, anonymity is hard to get – solely using Tor doesn’t guarantee it. Malware, Cookies, Java, Flash, Javascript, and more will most certainly compromise your anonymity. Even the people from the Tor Project themselves state that “Tor can’t solve all anonymity problems. It focuses only on protecting the transport of data.” Therefore, it is strongly advised not to use TorBox alone, should your well-being depend on your anonymity. In such a situation, it may be better to use Tails. Please, read in the FAQ more about tracking and fingerprinting in web browsers.
Where to go from here?

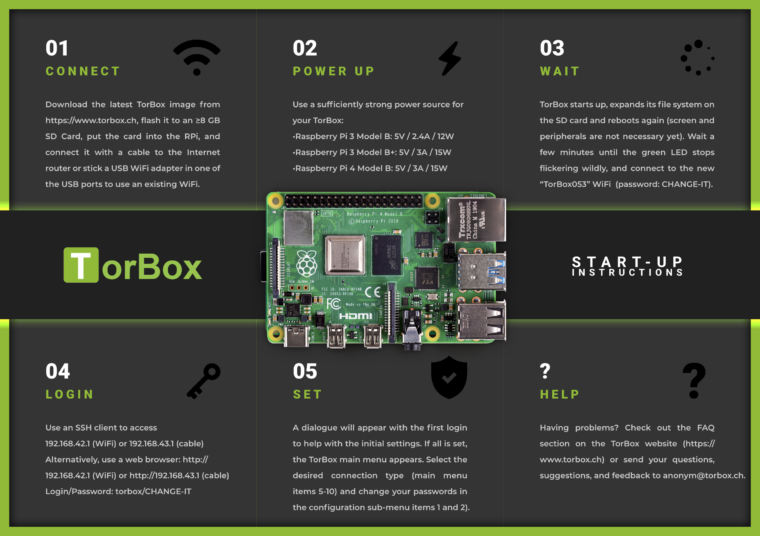
- Download the latest TorBox image (TorBox v.0.5.3 based on Raspberry Pi OS “Bookworm” lite 64-bit with the Linux Kernel 6.1.21 and Tor version 0.4.8.10 with obfs4proxy version 0.0.14 and Snowflake 2.8.0; ~1.25 GB) and verify the integrity of the downloaded file.
- Transfer the downloaded image file on an SD Card, for example, with Etcher. TorBox needs at least a 8 GB SD Card.
- Put the SD Card into your Raspberry Pi, link it with an Internet router using an Ethernet cable, or place an USB WiFi adapter in one of the USB ports to use an existing WiFi. Afterwards, start the Raspberry Pi. During the start, the system on the SD card automatically expands over the entire free partition – user interaction, screen, and peripherals are not required yet.
- After 2-3 minutes, when the green LED stops to flicker, connect your client to the new WiFi “TorBox053” (password: CHANGE-IT).
- Login to the TorBox by using a SSH client (192.168.42.1 on a WiFi client or 192.168.43.1 on a cable client) or a web browser (http://192.168.42.1 on a WiFi client or http://192.168.43.1 on a cable client; for a connection via cable, see here; username: torbox / password: CHANGE-IT).
- After seeing a welcome screen and answering some initial questions during the first start-up, you should see the TorBox Main Menu. Choose the preferred connection setup and change the default passwords as soon as possible (the associated entries are placed in the configuration sub-menu).
We recommend running TorBox on a Raspberry Pi 3 Model B+ or a Raspberry Pi 4 Model B under Raspberry Pi OS “Bookworm” lite (64-bit). TorBox should also work on a new Raspberry Pi 5, but we couldn’t verify this yet. For older (32-bit only) hardware and operating systems, please check our alternative installation scripts or build it from scratch using our manual.
Features
- TorBox routes all your network data through the Tor network. At the same time, TorBox acts as an external firewall and prevents IP leakage. It also can block insecure HTTP requests.
- With a menu system that can be accessed by a SSH client or a web browser, TorBox provides a user-friendly interface.
- TorBox supports Internet access via cable (Ethernet), WiFi, tethering devices, cellular links, USB dongles (
wlan1/eth1/ppp0/usb0), and VPN connections (tun0). - Clients can connect TorBox via WiFi (in most cases, an additional USB WiFi adapter is necessary) and cable (simultaneously; see here).
- It easily overcomes captive portals and offers, if necessary, measures against “disconnect when idle features” (sometimes seen with WiFis in airports, hotels, coffee houses).
- TorBox supports OBFS4, Meek-Azure and Snowflake bridges, which help to overcome censorship (with an easy to use interface).
- Also, TorBox supports Onion Services which allow easily and securely sharing of data through Tor and chatting securely accessing an .onion domain, even if TorBox is located behind firewalls, network address translators or placed in a censoring country while preserving the security and anonymity of both parties.
- If you have a public IP address, 24/7 Internet connectivity over a long time, and a bandwidth of at least 1 Mbps, TorBox can provide a bridge relay, easily configurable via a user-friendly interface to allow censored users access to the open Internet.
- It provides SOCKS v5 proxy functionality on the ports 9050 (standard) and 9052 (with destination address stream isolation).
- It allows easy access to .onion websites without client configuration (Chrome and Chromium) with a minor change in the settings (Brave) or via SOCKS v5 proxy (Mullvad and Firefox).
Alternative installation method with the TorBox installation script
Alternatively, you can download the latest version of Raspberry Pi OS Lite (64-bit) or use the Raspberry Pi Imager and choose, under Operating System, Raspberry Pi OS (other), the Raspberry Pi OS Lite (64-bit) image. With the Raspberry Pi Imager, you can also setup a Hostname, SSH, WiFi AP, username (use torbox), and your preferred password for a headless installation. If the username is not set, starting up the Raspberry Pi OS for the first time, the first-boot wizard enforces the creation of a new user account –> use torbox and your preferred password. Optionally, localize your installation with raspi-config. Ensure stable Internet connectivity, download and execute our installation script (for options, use --help):
cd
wget https://raw.githubusercontent.com/radio24/TorBox/master/install/run_install.sh
chmod a+x run_install.sh
./run_install.sh
See here for more detailed information and installation scripts for other systems, which might run on different hardware platforms.
Building from scratch
All you need to run TorBox on your Raspberry Pi is the image file. However, if you want to build it from scratch, whether you like to implement it to an existing system, to another hardware, respectively another operating system or you don’t trust an image file, which you didn’t bundle of your own, then check out our detailed manuals for a Raspberry Pi with Raspberry Pi OS Lite.
I want to help…
GREAT! There is a lot to improve and to fix (security of the entire system, graphical menu, cool logos …). We are searching for people who want to help, and we need especially your feedback to improve the system. You can start to contribute to our GitHub page or contact us. Also, look for our Job Postings. You can also donate to the Tor Project — without them, TorBox would not exist.
Contact
For secure email communication, we are using for the TorBox email Protonmail. All messages between Protonmail users are automatically end-to-end encrypted. Additionally, all messages in Protonmail inboxes are protected with PGP encryption to prevent Protonmail (or anyone else) from reading or sharing emails, a concept known as zero-access encryption. Creating a Protonmail email address is free and takes less than a minute. With Protonmail, anyone can use PGP regardless of their technical knowledge. However, technically versed, can also use our public PGP key to communicate with us:
-----BEGIN PGP PUBLIC KEY BLOCK-----
Version: OpenPGP.js v4.10.10
Comment: https://openpgpjs.org

xjMEXemNYRYJKwYBBAHaRw8BAQdAH22RKj/kZRqZds03njk7tSFEgrYkbeFo
PRC3CwA2JwPNI2Fub255bUB0b3Jib3guY2ggPGFub255bUB0b3Jib3guY2g+
wncEEBYKAB8FAl3pjWEGCwkHCAMCBBUICgIDFgIBAhkBAhsDAh4BAAoJEOhJ
KVODQehAkY8A/A7vPC+6nPaGBiv7P6wryQ+THA97uEwRK0Rsx3TYlKHuAQDN
M4XH5G++eqqptaEv1daJEofwOnYxahJoHzYvdfZUBM44BF3pjWESCisGAQQB
l1UBBQEBB0Cp+yT4Ec5kmGaGWneulB/KSgXLkkMSVaD++dC9mrcTfQMBCAfC
YQQYFggACQUCXemNYQIbDAAKCRDoSSlTg0HoQArZAQD94cT2csOWOsqqx7+q
Ps0P1Udn2/jXRbO+XbfzBzjM6wEAq4Z4g0w03KkHC3aU8/fATEnbN2+TInLV
gNKTldrMtAg=
=eGoI
-----END PGP PUBLIC KEY BLOCK-----
![]() OpenPGP key file: publickey.anonym@torbox.ch-69e114c5c446133a0489a6c0e84929538341e840.asc
OpenPGP key file: publickey.anonym@torbox.ch-69e114c5c446133a0489a6c0e84929538341e840.asc

