Your feedback matters to us! Already some time ago, we received requests like these:
It would be great if there is a vpn option […]. The goal is to remote access torbox from anywhere and go in tor network.
Is it possible to set up a vpn server on the same RPI3 to connect to it from outside and be redirected to tor by TorBox?
Obviously, a virtual server hosted by a provider is required to install TorBox on a Cloud. As a starting point, you can find a list of possible providers here and see if they accept running a Tor installation. Usually, Virtual Private Servers (VPS) running Debian (recommended) or Ubuntu are the most cost-effective solutions. Following, we explain how to install TorBox on a Cloud using one of our installation scripts.
• • •
IMPORTANT: THE USE OF THE INSTALLATION SCRIPT WILL CHANGE THE ENTIRE CONFIGURATION AND WIPE YOUR EXISTING INSTALLATION
Use the installation scripts only on a fresh, unused installation.
Under Debian, log in to your server as root. With Raspberry Pi OS or Ubuntu, log in to your server, create a user account called torbox, and log in to this account. Then download and start the installation script:
cd
wget https://raw.githubusercontent.com/radio24/TorBox/master/install/<script>
chmod a+x <script>
./<script> --on_a_cloud
Syntax : <script> [-h|--help] [--randomize_hostname] [--select-tor] [--select-fork fork_name] [--select-branch branch_name] [--on_a_cloud] [--torbox_mini] [--step_by_step] [--continue_with_step]
Options: -h, --help     : Shows this help screen ;-)
         --randomize_hostname
                        : Randomizes the hostname to prevent ISPs to see the default
         --select-tor   : Let select a specific tor version (default: newest stable version)
         --select-fork fork_owner_name
			            : Let select a specific fork from a GitHub user (fork_owner_name)
         --select-branch branch_name
                        : Let select a specific TorBox branch (default: master)
         --on_a_cloud   : Installing on a cloud or as a cloud service
         --torbox_mini  : Installing TorBox mini on a Raspberry Pi Zero 2 W
         --step_by_step : Executes the installation step by step
         --continue_with_step"
                        : Continue the installation with a certain step
Use for <script> run_install.sh, run_install_on_debian.sh or run_install_on_ubuntu.sh depending on the operating system on the server. The installation process runs almost without user interaction. However, macchanger will ask for enabling an automatic change of the MAC address – reply with NO! If you used the install script locally, via VNC, or an SSH client on a public IP, you have to continue with the same method as user torbox for the first start-up dialogue after the reboot at the end of the installation, because at this stage, OpenVPN is not yet configured. That’s exactly the next step: to configure the OpenVPN server. After fulfilling the dialogue to configure the OpenVPN server and a client certificate (stored in an .ovpn file in the TorBox’s home directory), you must download the .ovpn file to your client. After completing this step, the first startup dialogue continues with configuring the TorBox. Important: TorBox will only connect to the Tor network after completing the first start-up dialogue. We recommend selecting the Internet source if asked and not skipping this step. This will ensure that all configuration is set correctly.
Next, you have to install OpenVPN Connect on the client to connect the client to your TorBox via VPN. For a macOS client, we recommend Tunnelblick for its security features. After this point, you can use a SSH client or your web browser to reach the TorBox menu with the following address: http://192.168.44.1. As a reminder, using the web browser to connect to TorBox is only possible from a device on the local network (via an OpenVPN or Tunnelblick connection) because the connection between the browser and TorBox is not encrypted.
Important: If you aren’t able to connect to your TorBox OpenVPN server, then it could be that your VPS provider blocks port 1194 (UDP). In this case, you need to ensure that port 1194 (UDP) on your VPS is open to clients from the Internet. Usually, the VPS provider has a configuration page (for example, labelled “Firewall”) where you can configure port access.
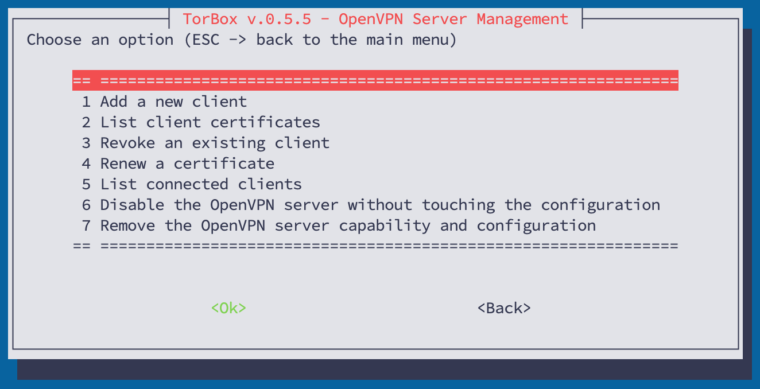
After a successful connection, all data traffic from the client device will be routed via a VPN tunnel to your VPN server on the TorBox on a Cloud, which will route the traffic through the Tor network. You can generate and give additional .ovpn files to others, who then can use your TorBox on a Cloud as a service, but cannot log into it as long as they don’t have the necessary passwords and/or SSH keys. However, if not configured otherwise, every client needs their .ovpn file. Once installed, you can use entry 19 in the Configuration sub-menu, which will show you the following sub-menu:
Security Settings
Even if the client is now routing packages through TorBox’s OpenVPN server, you should take the time to adjust some security settings. As with every other TorBox installation, you should immediately change the passwords in the Configuration sub-menu (check out the red-marked menu entries here). If you want to reach the TorBox with an SSH client over the Internet, we advise generating an SSH key using entry 2 in the Configuration sub-menu, downloading the private key to your client device, and, after testing, disabling the SSH password identification with entry 8 in the Danger Zone. Because connecting the TorBox from a client via OpenVPN is considered coming from a local network, you may want to disable SSH access from the Internet in the Danger Zone.
What can I do if the website doesn’t accept Tor connections?
Theoretically, on a local TorBox that the client device connects to via WiFi, a local VPN client (VPN over Tor) can temporarily bypass Tor, but it cancels out any security and anonymity advantages Tor offers (see more here). With Tor on a cloud, that’s impossible, and unfortunately, the specific website is not reachable. However, there is the possibility of excluding specific domains from routing through Tor by using entries 1-3 in the Danger Zone. As the name of the sub-menu already implies, this comes with risks.