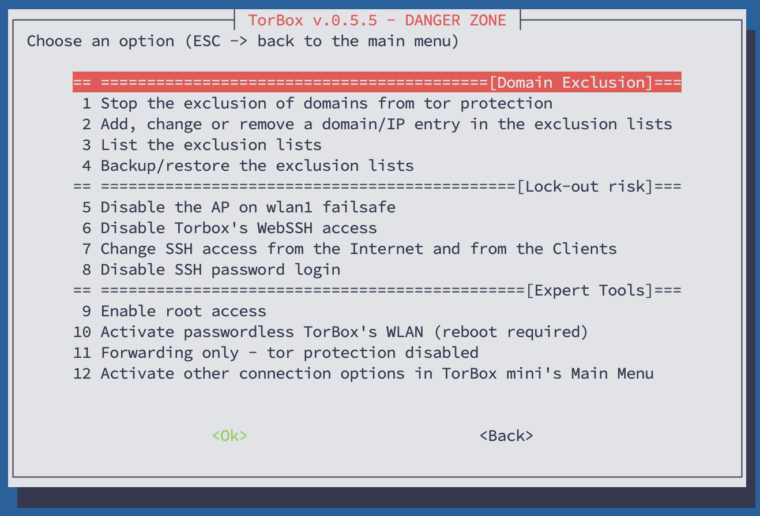
This sub-menu comprises features that are considered risky or could compromise the user’s security and anonymity. Therefore, these features should be used only if the user understands the associated risks and consequences. In the following, we look at all menu entries one by one:
- Menu entry 1: Start / Stop the exclusion of domains from tor protection: If this feature is started, TorBox will connect certain domains directly, meaning that these domains will not be routed through Tor. These domains, provided by the user, can be categorised into two buckets: CLEARNET and VPN. If you add a domain to the CLEARNET bucket, TorBox will always contact that domain directly. In the VPN bucket, TorBox will only directly contact the domain when connected to a VPN provider (either when main menu entry 10 is selected or entry 18 in the Countermeasure sub-menu is activated).
This feature was requested by a user who wanted specific government sites in an authoritarian country to be accessible directly, rather than via Tor, even though he used Tor for all other connections to protect himself. Another use case could be excluding a streaming service that doesn’t require protection (for example, a local music station) and consumes a significant amount of bandwidth. Please note that Tor does not protect traffic to or from IPs on the exclusion list. Anyone will probably see that you connect these IP addresses. If not encrypted correctly (for example, using HTTP, which is blocked by default), anyone can view the content of communications to and from these IP addresses.
- Menu entry 2: Add, change or remove a domain/IP entry in the exclusion lists: Let’s say you don’t want the streaming from
netflix.comto be routed through Tor. In this case, this menu entry, the domainnetflix.comcan be added to the exclusion list. Suppose the domain isn’t already in the exclusion list. In that case, you must choose which bucket the domain should be placed in: CLEARNET (always contact this domain directly) or VPN (contact the domain directly only if the TorBox is connected to a VPN provider). After this first step,netflix.com(or better, the associated IP addresses) will be excluded from Tor routing. The entry in the exclusion list looks like this:netflix.com 52.38.7.83 44.242.13.161 44.240.158.19
Next, the option for a deeper scan is offered, which makes sense in more complex situations (load-balanced sites, app requests, etc.) when additional subdomains or more IP addresses need to be excluded. It is essential that the domain is used as usual on the client during the deep scan, because the scan listens to DNS requests on the client’s interface. However, this can be a bit challenging because your client’s browser and/or the operating system typically cache the DNS response (the IP address) for some time. Using a different browser to connect or flushing your browser’s DNS cache will help. Another method is to flush your system’s DNS cache and then run ping (for example:ping netflix.com) on the client machine. How to flush the DNS cache of an operating system or a Chrome-based browser, see here. The scan automatically stops when it has enough data and shows you the screen below:
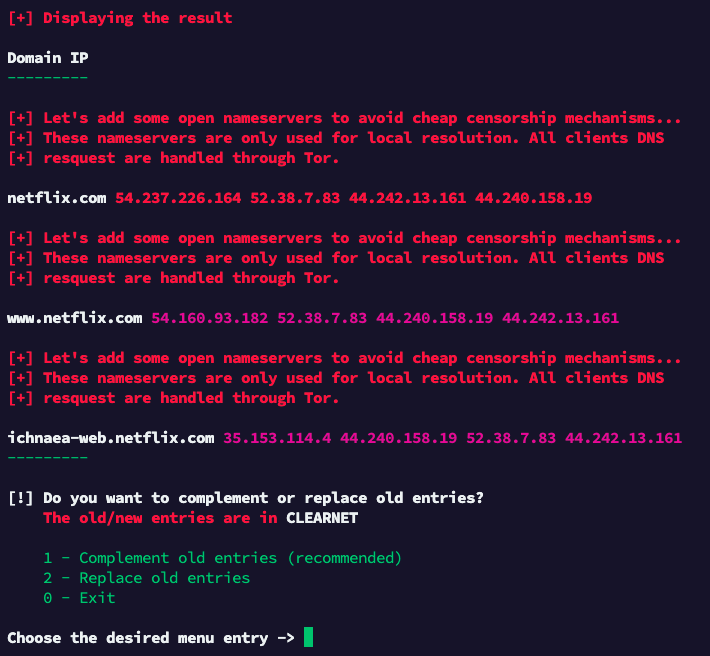
According to the result, the deep scan identified an additional IP (54.237.226.164) for netflix.com and two additional sub-domains (www.netflix.com and ichnaea-web.netflix.com), that were used during your interaction. The message about adding open nameservers is safe to ignore. If this is the first deep scan, repeat it to ensure all subdomains and IP addresses are added to the exclusion list. In our example, selecting “Complement old entries” is the right choice because we wouldn’t replace the already found IP. After choosing that entry, the exclusion list looks like the following: ichnaea-web.netflix.com 35.153.114.4 44.240.158.19 52.38.7.83 44.242.13.161
netflix.com 52.38.7.83 44.242.13.161 44.240.158.19 54.237.226.164
www.netflix.com 54.160.93.182 52.38.7.83 44.240.158.19 44.242.13.161
If you use the menu entry again and enter a domain that is already in the exclusion list (for example, netflix.com or www.netflix.com), you will see the following sub-menu:
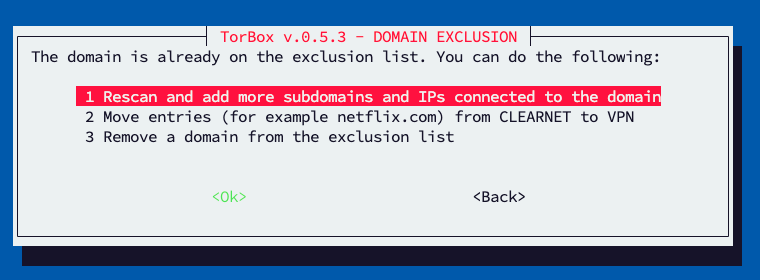
- Entry 1 will make/repeat a deeper scan of the domain to exclude (more) subdomains and IPs if available and linked with the domain. For more information, see above.
- Entry 2 gives the ability to move the domain from one bucket to the other (CLEARNET to VPN / VPN to CLEARNET).
- Entry 3 will remove the domain from the exclusion list.
Regarding entries 2 and 3, be aware that, for example,netflix.comwill also move/removewww.netflix.comandichnaea-web.netflix.com. However, if you enterwww.netflix.com, thennetflix.comorichnaea-web.netflix.com(and evenwww1.netflix.com) will not be affected.
- Menu entry 3: Lists the exclusion lists: does what it says.
- Menu entry 4: Backup/restore the exclusion lists: displays an explanation of how the exclusion lists can be manually saved and restored.
- Menu entry 5: Disable / Enable the AP on wlan1 failsafe: By default, TorBox’s wireless network (the Access Point; AP) is on the interface
wlan0representing the internal wireless chip. However, entry 7 in the main menu changes that because to use the internal chip to connect to the Internet, the AP has to be put onwlan1, which represents the USB wireless network adapter. However, problematic is that if TorBox is shut down, the USB wireless network adapter is removed, and TorBox starts again, the user is locked out. To avoid that, TorBox reverts any configuration during the boot, which puts the AP onwlan1. Of course, this is not something users want to have when they want the AP to stick to the USB wireless network adapter. In this case, they can disable the failsafe feature using this menu entry.
- Menu entry 6: Disable / Enable TorBox’s WebSSH access: With
webssh, users don’t need a SSH client because every web browser can jump in. A user on a Wi-Fi client can type 192.168.42.1; someone on a cable client can type 192.168.43.1; someone using VPN or TorBox mini can type 192.168.44.1. This functionality comes with a certain risk becausewebsshis not encrypted (this would need a self-signed certificate, which the browser doesn’t support easily). However, this shouldn’t cause any problems because the TorBox AP and its WLAN, or the connection cable, should be under your control. In case of a VPN connection to your TorBox (on a Cloud), the VPN connection takes care of the encryption. By default,websshcannot be accessed from the Internet. If you want maximum security, you can continue using an SSH client and even disablewebsshwith this menu entry.
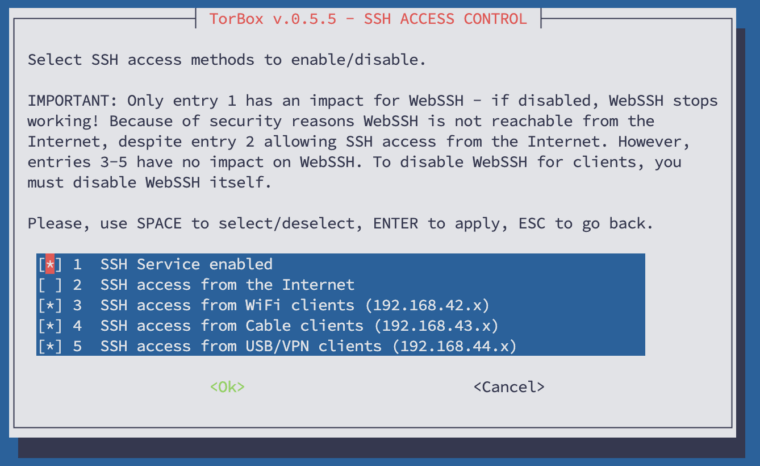
- Menu entry 7: Change SSH access from the Internet and from the Clients: With this menu entry, you can configure SSH access to your TorBox in detail. The following settings are possible (see image below):
– SSH Service as a whole can be enabled or disabled
– SSH access from the Internet can be allowed or blocked
– SSH access from WiFi, cable, USB or VPN clients can be allowed or blocked
- Menu entry 8: Disable / Enable SSH password login: does what it says. It makes particular sense after generating and using SSH keys for the TorBox SSH login, which can be done in the Configuration submenu, entry 2.
- Menu entry 9: Disable / Enable root access: In everyday use,
rootaccess is not necessary. TorBox running on Raspberry Pi OS has root access disabled by default. That’s most likely not the case with Debian- and Ubuntu-based installations. In some cases, for example,rootaccess is required at the beginning of a TorBox on a Cloud installation until all components are correctly configured and clients can connect to the TorBox on a Cloud using OpenVPN Connect or Tunnelblick. However, from a security standpoint, it is preferable to disablerootaccess after this initial phase. With this menu entry, you can disable or enable root access. Enablingrootaccess will also require a new password.
- Menu entry 10: Disable / Enable Passwordless TorBox’s WLAN (reboot required): does what it says.
- Menu entry 11: Forwarding only – tor protection disabled: The “forwarding only” mode for client data traffic will function as a router without tor protection. This feature was requested, but it mostly makes sense in the context of development and debugging.
- Menu entry 12 (only TorBox mini): Activate/deactivate other connection options in TorBox mini’s Main Menu: This menu entry is only displayed on a TorBox mini installation. By default, TorBox mini shows only one connection option: the Internet is connected through
wlan0, and the client is connected tousb0. However, advanced users may add connection options to the Raspberry Pi Zero 2 W and later want to switch to another option; therefore, they can use this menu entry to re-enable those options.
- Menu entry 12 (TorBox / TorBox on a Cloud): Convert a default TorBox installation to a TorBox mini installation: If TorBox is installed on an SD Card (Raspberry Pi OS / Debian), then the user can use this menu entry to convert the system to a TorBox mini installation. After using this menu entry, the SD card can be used with a Raspberry Pi Zero 2 W. This menu entry is intended only for developers.
- Menu entry 13 (only TorBox mini): Convert a TorBox mini installation to a default TorBox installation: The user can use this menu entry to convert a TorBox mini installation to a default TorBox installation. After using this menu entry, the SD card can be used with a default Raspberry Pi. This menu entry is intended only for developers.
• • •
Problems and questions
- TorBox’s wireless manager doesn’t show me any wireless networks (2.5 GHz and/or 5 GHz)! What can I do? –> see here.