After installing TorBox either by using the image file and the corresponding start-up instruction, or by running our installation script, or manually according to our detailed manual, TorBox can be accessed with an SSH-client either by TorBox’s WLAN (password: CHANGE-IT) and/or by an Ethernet connection. If a client is connected via an Ethernet cable to the TorBox, whether using the onboard or external Ethernet adapter, the TorBox functionality is automatically enabled for that client. To establish a connection between the SSH-client and TorBox, use 192.168.42.1 (username: torbox / password: CHANGE-IT); with an Ethernet connection, use 192.168.43.1 (username: torbox / password: CHANGE-IT); using TorBox on a Cloud or TorBox mini, use 192.168.44.1 (username: torbox / password: CHANGE-IT). The TorBox Menu can also be accessed via a web browser at http://192.168.42.1 on a WiFi client, http://192.168.43.1 on a cable client, http://192.168.43.1 with TorBox on a Cloud or TorBox mini.
In the following, we look at all menu entries one by one:
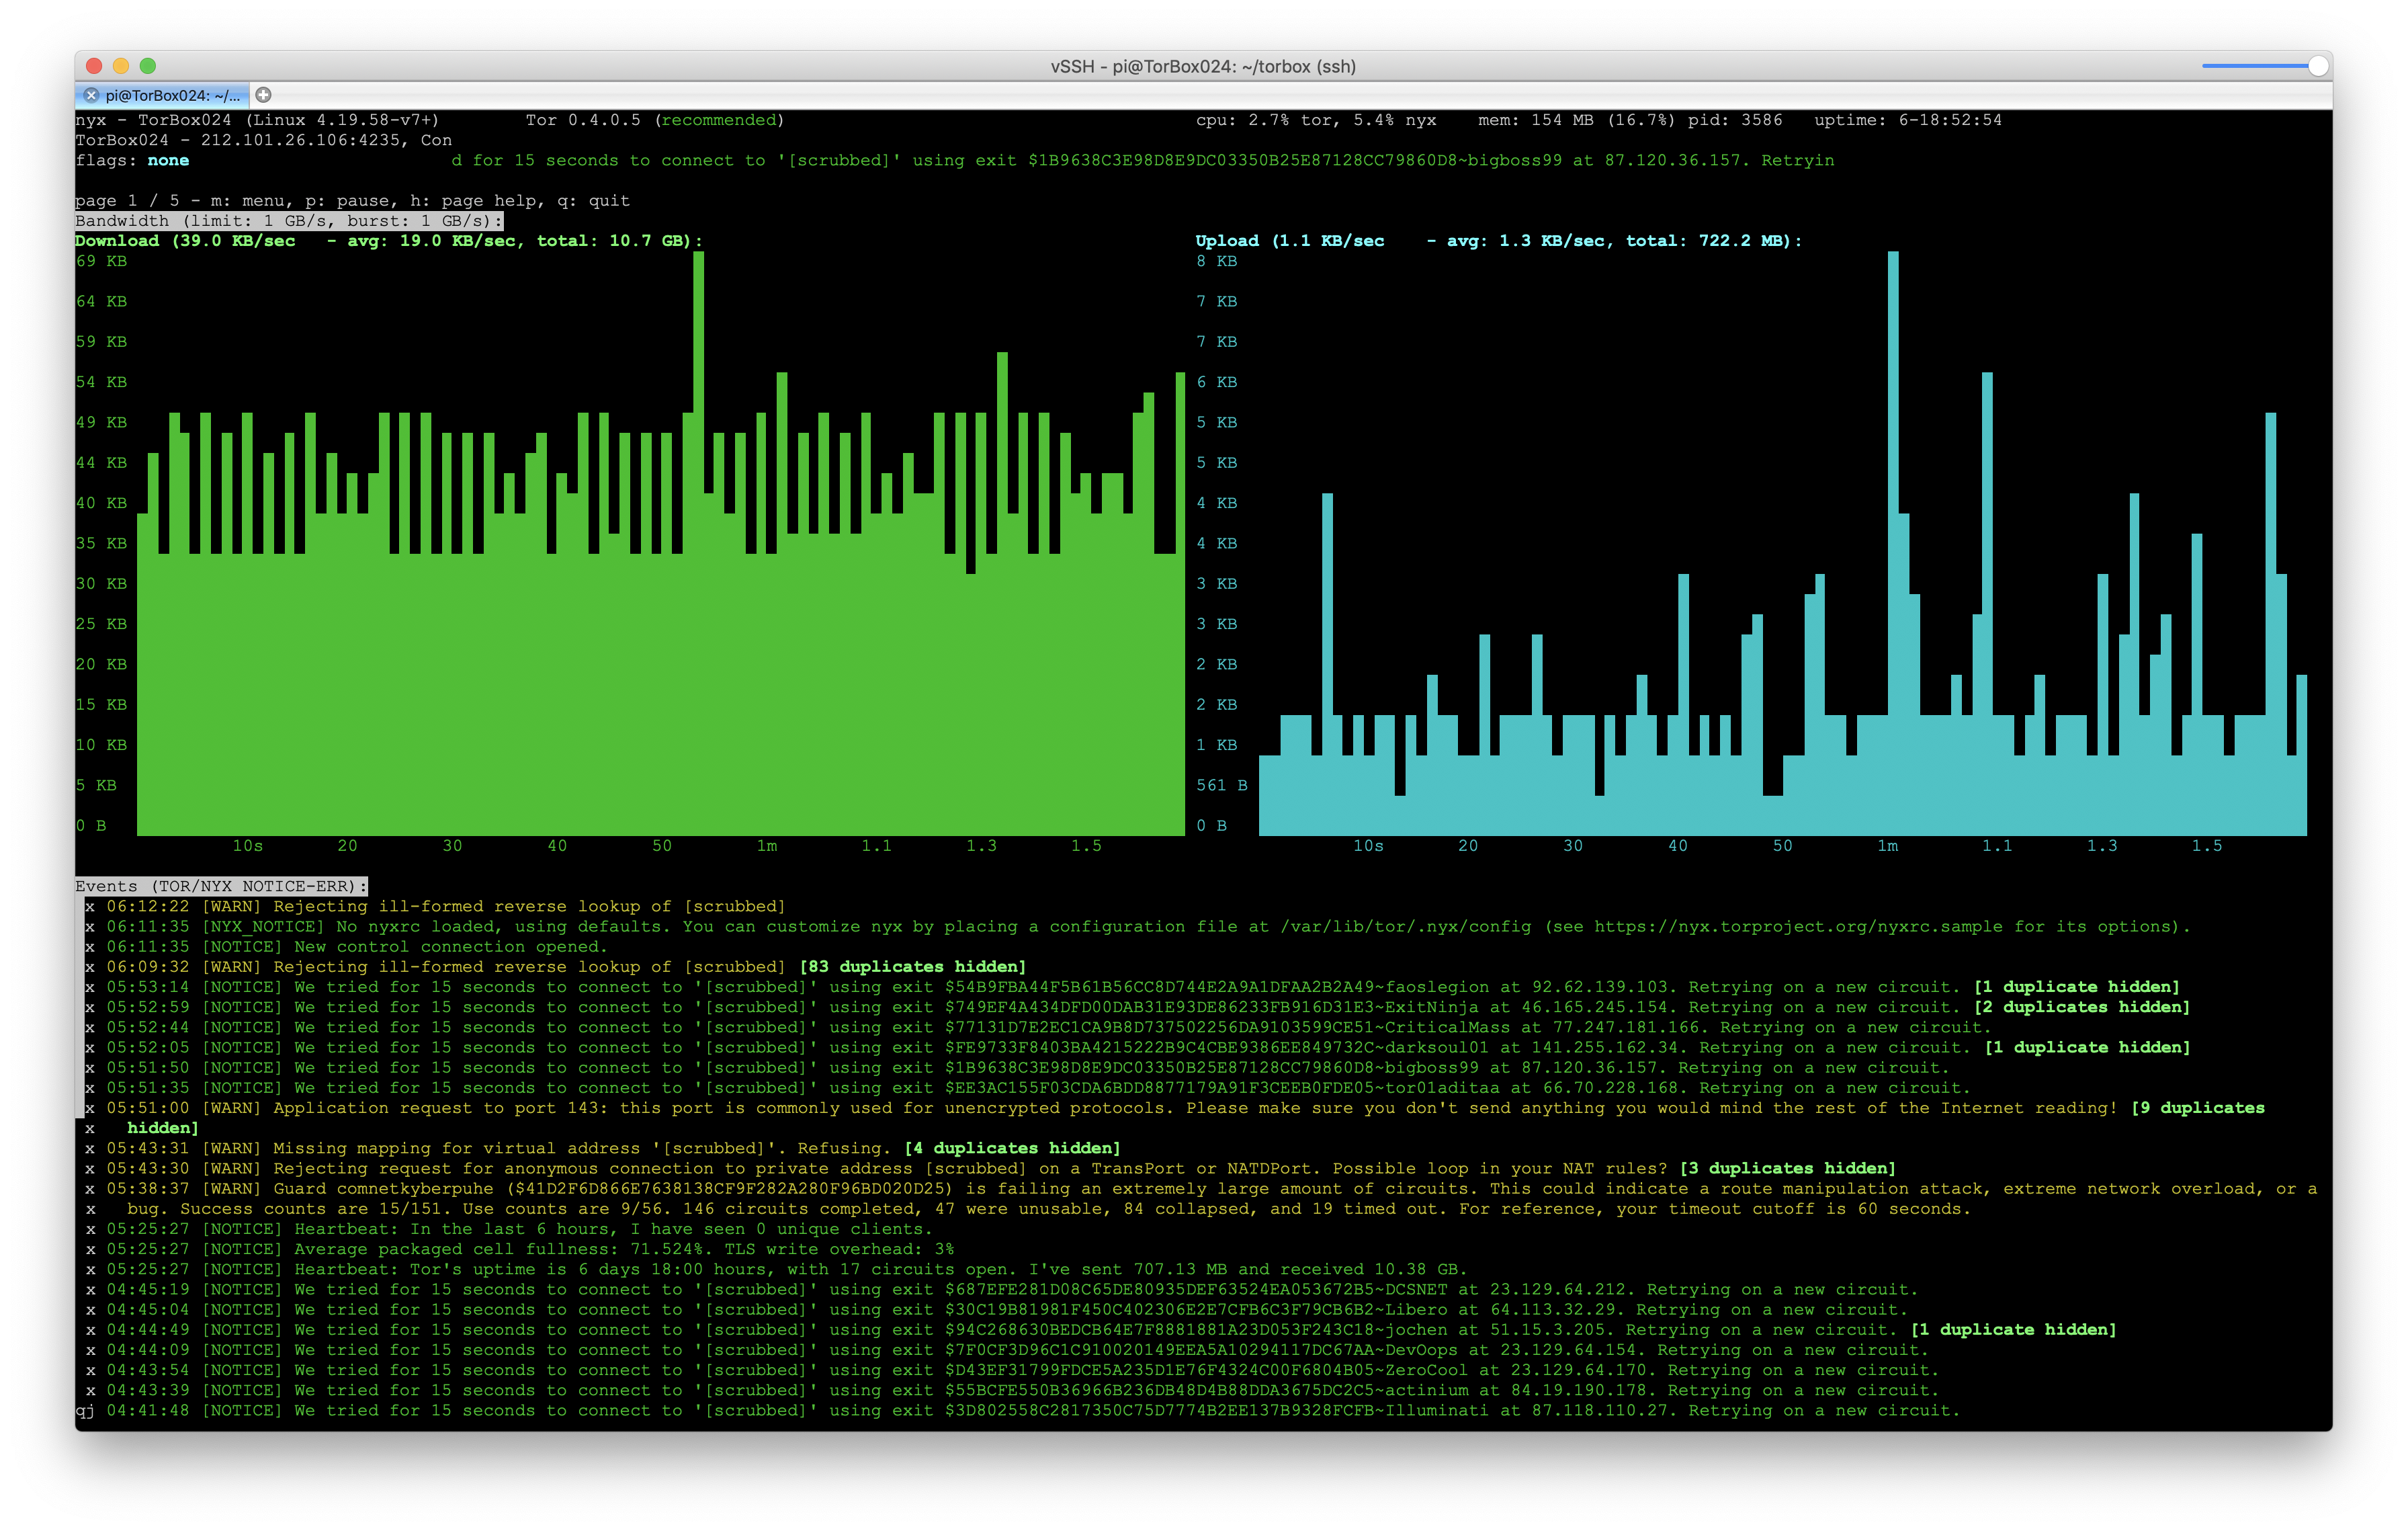
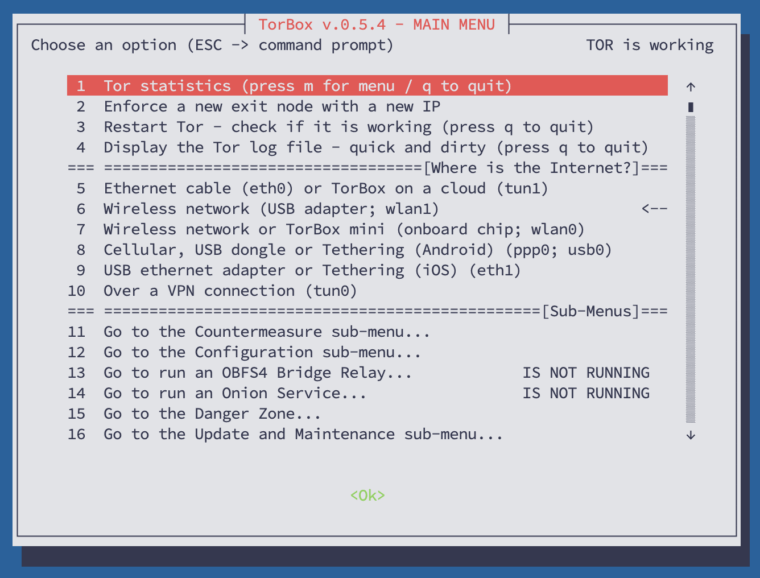
- Menu entry 1: Tor statistics: This menu entry starts Nyx, a very informative statistics tool. In addition to showing the actual data transfer rate and the last log messages, you can also reset Tor or create a new identity. Press “h” to display a brief help window, “m” to activate a simple pull-down menu, and use “q” twice to quit the statistics.
Important: Nyx, which shows the Tor statistics, uses the control port of the local Tor installation. Unfortunately, if Tor gets stuck in its boot process (due to network issues or censorship), it displays only a black screen with a blinking cursor. In this case, take menu entry 4, “Show the Tor log file—quick and dirty.” The screen updates automatically when a new entry is written to the log file. Press CTRL-C to leave the log.
Also, Nyx is not designed to run for extended periods (hours or even days) because it consumes significant resources, especially memory.
- Menu entry 2: Enforce a new exit node with a new IP: The title of this menu entry is, without doubt, self-explanatory. By default, Tor changes its circuit every 10 minutes, which results in a change of the external IP address. This menu entry forces an immediate change, which can resolve issues with unresponsive or slow circuits or with blocked IPs from known exit nodes.
Important: Even if the middle and exit nodes change, the entry guard remains the same. That’s intentional: a fast, stable relay remains in the circuit as an entry guard for 2-3 months to protect against a known anonymity-breaking attack (for more information, see here). However, you have more reset possibilities in the update and maintenance sub-menu (menu entry 10).
- Menu entry 3: Restart Tor – check if it is working: Troubleshooter – could be necessary, i.e., if Tor doesn’t work as expected and therefore you want to restart it. Please be patient! Depending on your configuration, restarting Tor can take up to 5 minutes. Usually, any error messages can be ignored, just wait! You should see “Bootstrapped 100%: Done” at the end. Press q to leave the log.
- Menu entry 4: Display the Tor log file – quick and dirty: As the name suggests, the Tor log file is displayed and automatically refreshed when new entries are added. This is useful when connection errors occur, and Nyx (menu entry 1) cannot be started. Press q to leave the log.
- Menu entries 5-10: With these menu entries, you can choose and change where you get the Internet.
Currently, TorBox supports the following connections:
INTERNET     CLIENT                Remarks
--------------------------------------------------------------------------------------------
ETH0         WLAN0(+ETH1+TUN1)     Ethernet cable (eth0) or TorBox on a Cloud (tun1)
ETH1         WLAN0(+ETH0)          USB-Ethernet adapter or Tethering (iOS)
WLAN1        WLAN0(+ETH0)          Wireless network (USB adapter; wlan1)
WLAN0        WLAN1(+ETH0+USB0)     Wireless network or TorBox mini (onboard chip; wlan0)
USB0	     WLAN0(+ETH0)          USB dongle or Tethering (Android) (usb0)
PPP0         WLAN0(+ETH0)          Cellular-internet
TUN0         WLAN0(+ETH0)          Over a VPN connection
You have to read the table in the following way: If you choose to have the Internet source from an attached Internet cable using eth0 or you are using TorBox on a cloud, your client can connect the TorBox via TorBox’s Access Point running on the onboard chip (wlan0), through an Ethernet cable between the client and an USB-Ethernet adapter attached to the TorBox (eth1) or through a VPN connection between the client and the TorBox on the Cloud (tun1).
Important
- By default, on a TorBox mini, only entry 7 is offered as an Internet source. However, for special setups, you can turn the display of all usual connection options on by a menu entry in the Danger Zone sub-menu, even if they aren’t really available.
- By default, on a TorBox on a Cloud, only entry 5 is offered as an Internet source.
- For menu entries 6 and 7, an additional USB-WiFi adapter is required in most cases.
- You can only use one Internet connection. Especially if you don’t have Internet access via an Ethernet cable (
eth0), you must remove the cable. Otherwise, TorBox assumes there is a client on that cable, which is not the case and will likely block Tor loading (this is the case if menu entry 3 shows a blank screen). - TorBox is configured as a DHCP client, which means the router must provide TorBox with all necessary network information (the router is usually configured that way). If that doesn’t work, check out this FAQ entry.
VPN
There are two possibilities of how TorBox handles VPN connections:
- The VPN connection is already established, and the
tun0interface is configured (either manually or via menu entry 18 in the countermeasure submenu). - The VPN connection is not established yet, but one or more
*.ovpn– files are in the~/openvpndirectory so that TorBox can execute OpenVPN with that file.
To completely disconnect from a VPN, please use the countermeasure sub-menu entry 18. Using main menu entries 5-9 will only change the route of Tor’s network traffic to the Internet; local network traffic from the command prompt will still be routed through the VPN.
For more information about “VPN over Tor” and “Tor over VPN“, see the FAQ.
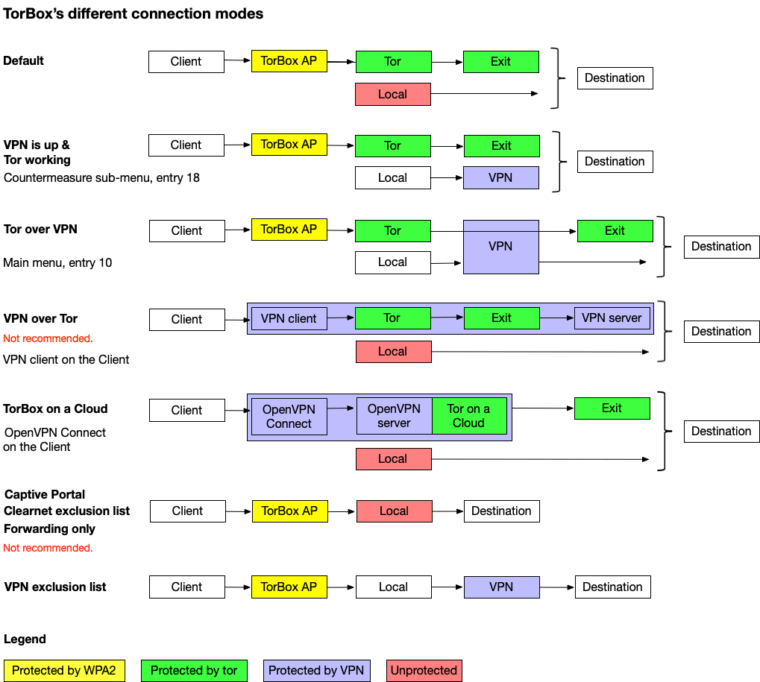
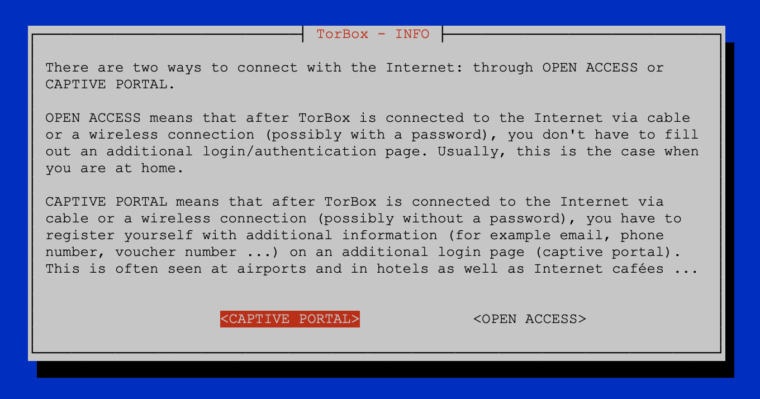
“Open access” or “captive portal”
All connection setting menu entries support “open access” or “captive portal”. “Open access” means that you have already entered a password to access the provided network, and you don’t have to fill out an additional login/authentication page. By contrast, captive portals require additional login pages that you must register for. See here for more information on how to pass through a captive portal.
- Menu entry 11: Go to the Countermeasure sub-menu…: This sub-menu deals with the circumvention of censorship by using bridges. It allows you to enable, disable or/and configure the bridge mode easily. Furthermore, it gives some more tools to deal with obstacles from the Internet provider, for example, measures against a tightly configured firewall, the possibility to randomise the hostname of the TorBox, avoid disconnection when idle, the possibility to connect/disconnect TorBox to/from a VPN, etc. For more information, see here.

- Menu entry 12: Go to the Configuration sub-menu…: This sub-menu gives you the ability to change some basic configurations like passwords, network, security, tor and logging settings. From that sub-menu, additional software can be installed to support currently three hardware accessories (Adafruit’s PiTFT displays, Sixfab Shields/HATs for cellular connections, and 3.5″ no-name TFT displays). For more information, see here.
- Menu entry 13: Go to run an OBFS4 Bridge Relay…: This sub-menu offers you a simple way to set up a bridge relay. However, to do so, you need a public IP address, 24/7 Internet connectivity over a long time, and a bandwidth of at least 1 Mbps. By setting up an OBSF4 bridge relay, you can help censored users access the open Internet via Tor. For more information, see here.
- Menu entry 14: Go to run an Onion Service…: With this sub-menu, sharing a folder with a static webpage, files, etc. on a .onion domain with or without client access control is easy, even if the TorBox is located behind a firewall, a network translator, or in a censoring country. With TorBox File Sharing (TFS), upload and/or download files can be allowed to the public or specific clients, and with TorBox Chat Secure (TCS), a secure chat environment can be established. For more information, see here.
- Menu entry 15: Go to the Danger Zone…: This sub-menu comprises features that are considered risky or could compromise the user’s security and anonymity. Therefore, these features should be used only if the user understands the associated risks and consequences. You will find a feature in this submenu to exclude domains from Tor protection. A “forwarding only” mode for client data traffic will function as a router without Tor protection. This feature was requested, but it makes sense primarily for development and debugging. For more information, see here.
- Menu entry 16: Go to the update and maintenance sub-menu…: This sub-menu allows to backup and restore TorBox ‘s configuration (including OBFS4 Bridge Relay and Onion Service), update or even reset your TorBox, and fix some inconveniences, if necessary. For more information, see here.
- Menu entry 17: HOW CAN I SUPPORT THE TOR PROJECT!: This sub-menu displays a text file on how the Tor project can be supported.
- Menu entry 18: HOW CAN I HELP WITH TORBOX?: This sub-menu displays a text file on how you can help to develop TorBox further.
- Menu entries 19: Reboot / Shutdown TorBox: Here, you can choose to reboot or shut down the TorBox.
• • •
Pressing the ESC key exits the TorBox main menu, and you are taken to the command line. This gives you full access to your entire system. You can reload the menu with the command ./menu in ~/torbox. The menu is reloaded each time you open a new console. If you like to avoid that, then use the following procedures:
cd
sudo nano .profile
Remove the following lines at the end of .profile:
cd torbox
./menu
Important: Network transfers from the command line do not pass through Tor and are, therefore, by default, not secured or anonymised.
• • •
“TOR is working”
A little message (“TOR is working”, “VPN is up & TOR working” or “VPN is up”) in the right corner of the main menu shows you immediately if you are connected with the Tor network (meaning https://check.torproject.org returns a positive result) and/or if the TorBox is connected to a VPN. Since a missing “TOR is working” does not automatically mean that there is no connection to the Tor network, no error message is displayed. In other words, if this message is missing, there may be a connection issue.
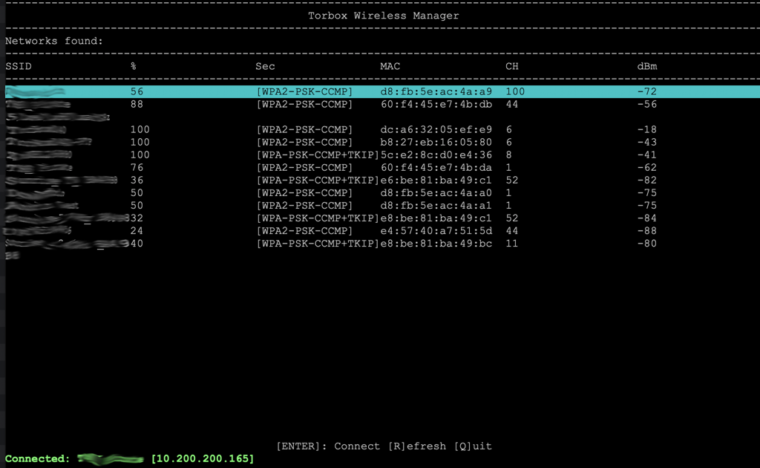
Using Torbox’s Wireless Manager (TWM)
TWM is very easy to use and self-explanatory. You selected the Wireless Network you want to connect to, then press ENTER. If TWM requires a password, it will prompt for one; otherwise, it will connect to the network. Next time you start TorBox with a USB Wi-Fi adapter plugged in, TWM will automatically attempt to reconnect to the wireless network. The same applies when TWM is started from the main menu. In the update and maintenance sub-menu, these remembered wireless networks can be reset with entry 9.
• • •
Problems and questions
- Can I use TorBox and VPN together? –> see here.
- Can Tor protect me against tracking and/or fingerprinting in web browser to guaranty my anonymity accessing a website? –> see here.
- How can I access the TorBox Menu? –> see here.
- How can I be sure that my devices are using the Tor network? –> see here.
- How severe is the risk of a traffic correlation analysis? –> see here.
- I can’t get tethering to work. What’s wrong with it? –> see here.
- I can’t get TorBox to work and need more detailed help! What should I do? –> here.
- I have problems with the wifi network from/to TorBox/Internet router/clients connected to the TorBox. Please fix it for me! –> see here.
- I heard that transparent Tor proxies are dangerous! I shouldn’t use TorBox, right? –> see here.
- I’m connected to TorBox with an ethernet cable, and all is working as expected. However, when I change my Internet to “Wireless network”, I’m not able to connect to the Internet anymore. –> see here.
- My client, which is connected to the TorBox, doesn’t receive an IP address. –> see here.
- Is the use of a TorBox (or tor in general) considered secure? –> see here.
- My TorBox doesn’t receive an IP address from the network router. –> see here.
- My TorBox is connected to a captive portal (used in airports, hotels, coffee houses, etc.) and cannot connect to bridges. What’s wrong? –> here.
- My TorBox is connected with the Internet via ethernet. I’m using onboard WiFi for my client devices. How can I additionally connect a cable client? –> see here.
- My TorBox receives an IP address (192.168.42.* or 192.168.43.*) from the network router, but it doesn’t work. –> see here.
- Tor did work without a problem. The Internet is reachable. Nevertheless, after a restart of TorBox, Tor doesn’t load anymore. It has been stuck at “Bootstrapped 0%” for more than 5 minutes! How can I fix that? –> see here.
- My wireless network has non-latin characters. How can I connect to such a wireless network using TorBox’s wireless manager? –> see here.
- Tor statistics don’t show up — the screen stays black. What can I do? –> see here.
- TorBox’s wireless manager doesn’t show me none or not all wireless networks (2,5 GHz and/or 5 GHz)! What can I do? –> see here.
- What are the main differences between TorBox and Whonix? –> see here.
- When I boot up my TorBox, I can see the following error: “Failed to start Raise network interfaces” – what does it mean? –> see here.
- When I start the Tor Bowser or when I open a window with Tor on Brave (both running on a client device of the TorBox), they cannot connect to the tor network. The same happens if I’m using Tails behind a TorBox. –> see here.
- Why do I receive a grey onion on the Tor Project’s check-site? –> see here.
- Why is the local TorBox traffic not routed through tor? Why is by default Google’s and/or Cloudflare’s service used to circumvent cheap censorship measures or to test the connectivity? Can I change Google and/or Cloudflare services with something else? –> see here.
- Why is tor so slow – is the tor network broken? –> see here.