Short Explanation and requirements
Almost everyone can help others in censored countries connect to the open Internet. OBFS4 Bridge Relay are relatively easy, low-risk and low bandwidth Tor nodes to operate, but they significantly impact users. A bridge isn’t likely to receive any abuse complaints, and since bridges are not listed as public relays, they are unlikely to be blocked by popular services.
In general, relays that make up the Tor network are publicly listed. One way to prevent people from using Tor is to block the public IP addresses of all thousands of Tor relays. However, thanks to bridges, Tor users can still connect to the network when the public Tor relays are blocked. Not only are bridges private, but they can also modify their network packets in a way that it’s difficult for an observer to conclude that somebody is using Tor — that’s when OBFS4 comes into play. Unfortunately, the number of bridge relays is slowly decreasing (currently, there are only about 2’000 OBFS4 bridge relays). The Tor network needs a constant trickle of new bridge relays that aren’t blocked anywhere yet — and you can help with that! Setting up a bridge relay can help censored users connect to the open Internet through Tor.
For setting up a bridge relay, your internet connection has to meet some minimal requirements:
- It has to offer at least a 1 Mbit/s down-/upload bandwidth (Speedtest).
- 24/7 internet connectivity for a longer time (weeks or months)
- The ability to expose TCP ports to the internet (public IP, port forwarding; make sure that NAT doesn’t get in the way).
How to do it?
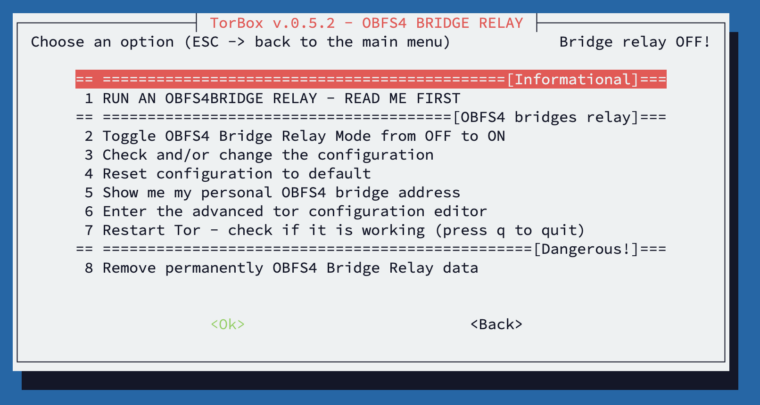
With the help of the OBFS4 Bridge Relay sub-menu, you can easily set up your OBFS4 Bridge Relay if you meet the abovementioned requirements. The activation of a bridge relay is a three-step process:
- Check and/or change the configuration (menu entry 3).
- Toggle the OBFS4 BRIDGE RELAY MODE from OFF to ON (menu entry 2).
- Restart Tor (menu entry 7).
To confirm your bridge relay is running, you should see something like this in the log (menu entry 7):
[notice] Your Tor server's identity key fingerprint is '<NICKNAME> <FINGERPRINT>'
[notice] Your Tor bridge's hashed identity key fingerprint is '<NICKNAME> <HASHED FINGERPRINT>'
[notice] Registered server transport 'obfs4' at '[::]:46396'
[notice] Now checking whether ORPort <redacted>:3818 is reachable...
[notice] Self-testing indicates your ORPort is reachable from the outside. Excellent. Publishing server descriptor.
After restarting Tor, you can perform a TCP reachability test with your IP and your OBFS4 port. After about 1-3 hours, you can monitor your OBFS4 bridge relay on Tor Metrics by searching for your fingerprint. Another way is to use this URL, after 24h: https://bridges.torproject.org/status?id=<FINGERPRINT>. However, it can take several days or weeks to see an advertised bandwidth and a consistent set of users. Don’t get discouraged if you don’t see user connections immediately (see also here for more details). For the necessary values, check menu entries 3 and 5.

Important: Changing the connection settings in the main menu, activating OBFS4, Meek-Azure and Snowflake bridges, or resetting Tor deactivates the bridge relay mode automatically. However, all the configurations are saved so that it is easy to restart the bridge relay mode again (menu entry 2 and then menu entry 7).
In the following, we look at all menu entries one by one:
- Menu entry 1: Run an OBFS4 Bridge Relay – Read Me First: This brief introduction is intended to help new users, in particular, to understand and to simplify the set up of a bridge relay within TorBox. It is a summary of what has been written above.
- Menu entry 2: Toggle OBFS4 Bridge Relay Mode: You either can switch the bridge relay mode on or off. Before you toggle the bridge relay mode from off to on, you should check and/or change the configuration (menu entry 3). Deactivating the bridge mode automatically restarts Tor. The current configuration will be saved and reused with the next activation.
- Menu entry 3: Check and/or change the configuration: Choosing this menu entry, you can change the following settings:
.- ORPort: This port must be externally reachable. Avoid port 9001 because it’s commonly associated with Tor, and censors may be scanning the internet for this port. The default is 4235.
- OBSF4Port: This port must be externally reachable and must be different from the one specified for ORPort. Avoid port 9001 because it’s commonly associated with Tor, and censors may be scanning the internet for this port. Good port numbers are 80 and 443. The default is 443.
- Contact Email: You should add a contact email, so the people from the Tor Project can contact you if there are problems with your bridge. This is optional but encouraged. The default is <[email protected]>.
- Nickname: Pick a nickname that you like for your bridge. This is optional. The default is “TorBox042”; however, you can let the entry stay blank.
- Distribution Method: Chose one of the OBFS4 distribution methods: ANY is the default and let the BridgeDB decide; HTTPS for the distribution through the bridge website; MOAT to be directly fetched by the Tor Browser; EMAIL for the distribution through email or NONE to avoid a distribution (used for private bridges).

- Menu entry 4: Reset configuration to default: Does what it says.
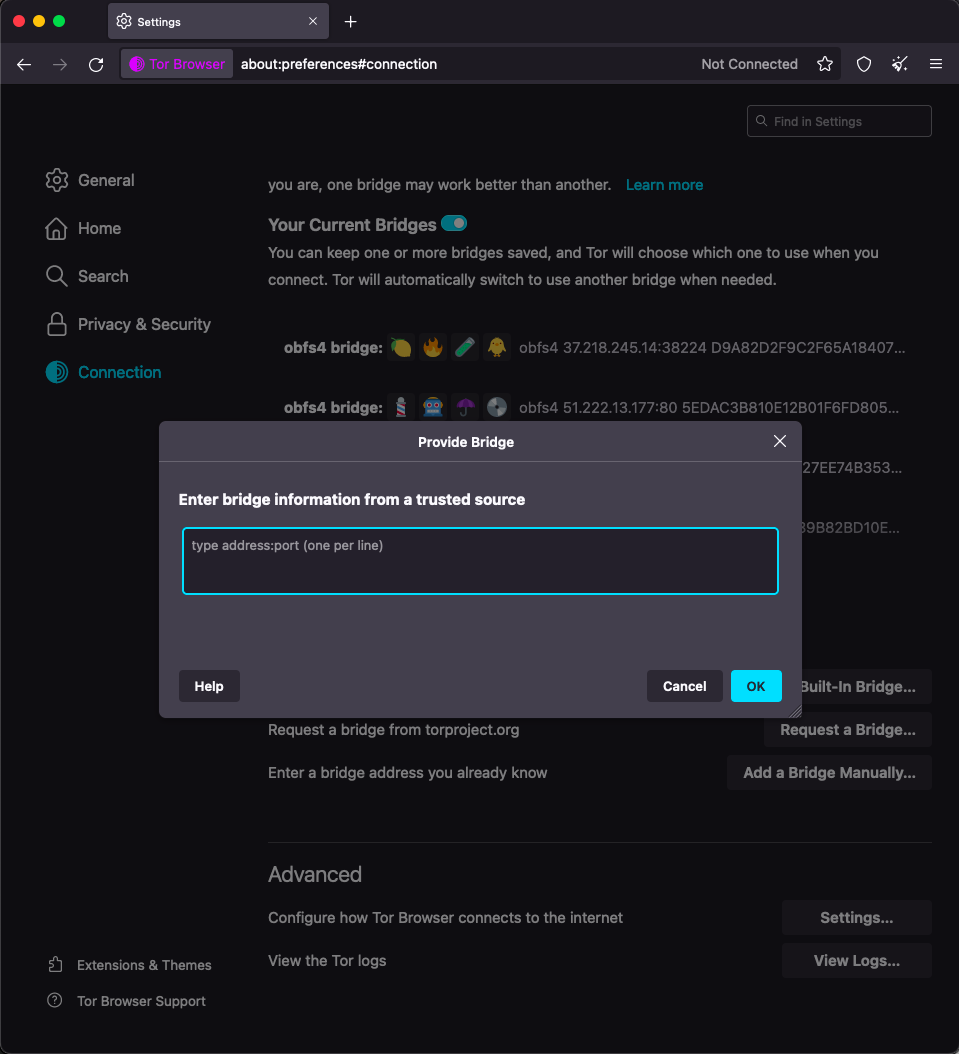
- Menu entry 5: Show me my personal OBFS4 bridge address: Does what it says. You can copy the address, give it to a friend in need, and/or use it with another TorBox or with the TorBrowser (see image below) if you are in a country with internet censorship.
- Menu entry 6: Enter the advanced configuration editor: This entry loads the Tor configuration file into a textual editor. You should know what you are doing before you change anything in the configuration file — here, you can break your TorBox. If you are unsure, then contact us. Did you something wrong? You can always overwrite this configuration with the default one, stored in ~/torbox/etc/tor/. After changing the configuration, use the following commands in the editor: CTRL-O followed with an ENTER to save the changes. CTRL-X to exit the editor.
- Menu entry 7: Restart Tor – check if it is working: To toggle the bridge relay mode on doesn’t restart Tor. You have to restart Tor with this menu entry — that’s the final step. On the contrary, if you toggle the bridge relay mode off, we directly restart Tor. In both cases, please be patient! It can take up to 5 minutes for Tor to be ready for connections.
- Menu entry 8: Remove permanently OBFS4 Bridge Relay data: This entry permanently deletes the OBFS4 Bridge Relay data on your TorBox.
• • •
Problems and questions