A captive portal is a web page accessed with a web browser that is displayed to newly connected users of a wireless or wired network before they are granted broader access to network resources. Captive portals are commonly used to present a landing or login page, which may require authentication, payment, acceptance of an end-user license agreement, acceptable use policy, survey completion, or other valid credentials that both the host and user agree adhere to. Captive portals are used for a broad range of mobile and pedestrian broadband services – including cable and commercially provided WiFi and home hotspots.
However, captive portals were invented by the devil! There are several ways to configure a captive portal, and many of these configurations are terrible. That’s why we provide with TorBox two different approaches to pass through a captive portal: with SPOOFING or with TUNNELLING. Our preferred method is SPOOFING.
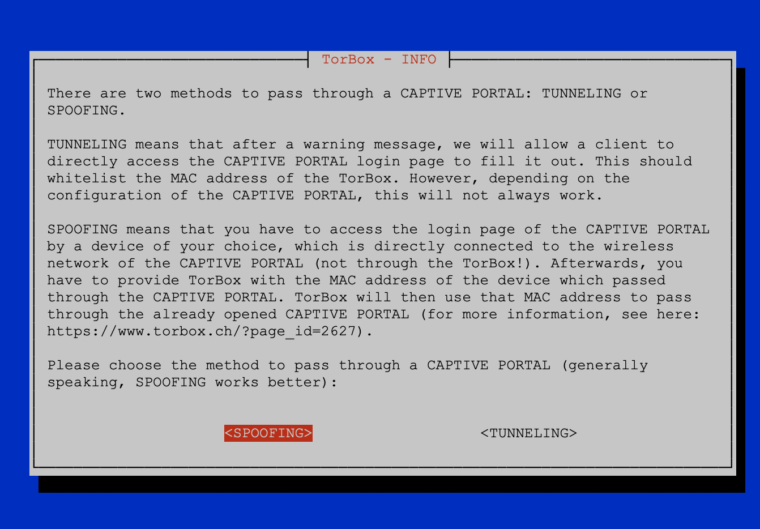
Spoofing
Spoofing means that a device (not the TorBox) has to access the captive portal directly, pass through the login page by filling out the form, accept the terms of use, etc. Then the MAC address of that device is used by TorBox to pass through the captive portal. There are different locations where you can find the MAC address of a device – here is a good overview of the location of the MAC address on different devices/operating systems.
Afterwards, TorBox can use the whitelisted MAC address. Choose the connection type to the Internet on the Main Menu of TorBox (entry 5-10), then select CAPTIVE PORTAL and choose the SPOOFING method. Then select “Change/randomize the MAC addresses of TorBox’s interfaces” and select the Interface which will be connected with the captive portal (Internet). Then enter the MAC address, which TorBox will use instead of its real MAC address. You can also choose if the MAC address should be saved or not. If you decide to keep it, TorBox will also use that MAC address for the next reboot. If you choose NO, TorBox will switch back to its real MAC address or use a randomized with the next reboot.
Tunnelling
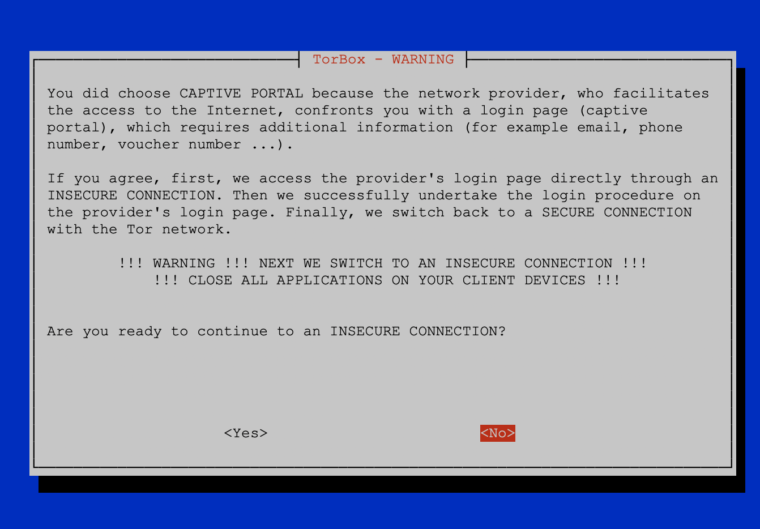
Tunnelling means that after a warning message (see below), TorBox will allow a client to directly access the login page of the captive portal to fill it out. This should whitelist the MAC address of the TorBox itself. However, depending on the captive portal configuration, this will not always work. We even think that more and more captive portals block this approach. This is why we plan to deprecate this method after a long-term test phase of the spoofing method.
Using both methods simultaneously
Some captive portal use a combination of the MAC address and the IP address of the connected client. SPOOFING alone will not work in this case because even the MAC address is whitelisted from another device, most probably the IP address will be different. Here TUNNELLING will be more succesfull. If this doesn’t work, try first to whitelist the MAC address by another device and use the SPOOFING method. Additionally use TUNNELLING to whitelist the new IP address of the client.
Additional Information
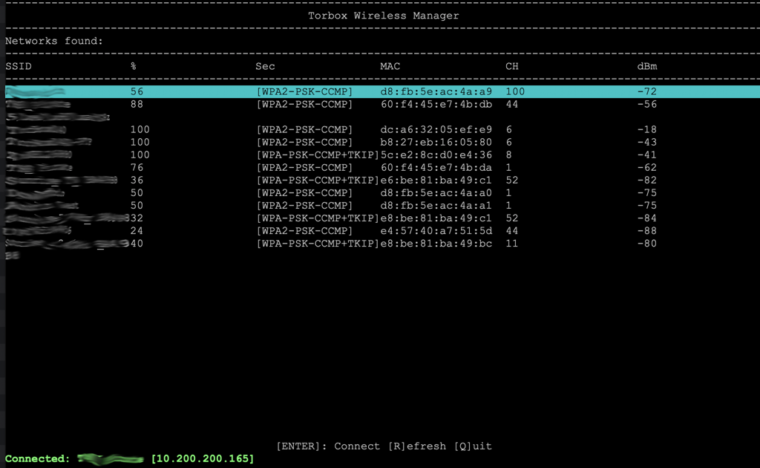
- If you have problems connecting to a public wireless network within the TorBox Wireless Manager (TWM), please try another one with the same name. The best way is to start with the one with the strongest signal (starting with TorBox v.0.5.0, the SSIDs are sorted by the signal strength). Also, it is a good idea to select networks that don’t share their channel (the “CH” column in TWM, see the image below) with other networks. Don’t forget that your AP also uses a channel, which you can change in the Configuration sub-menu. Signal interference is a significant source of problems.
- USB WiFi adapters, which are not supported out of the box (especially for 5 GHz networks), sometimes lead to problems. It is dependent on the type of USB WiFi adapter and the quality of the driver. If unsure, try to connect with a simple 2,5 GHz USB WiFi adapter supported out of the box.
- Also, DNS resolution has to go through the captive portal because, in this way, it will send the IP address of the captive portal form. This is why, with TUNNELLING, HTTP requests will not work – please take one of the provided HTTP links.
- There are additional possible pitfalls. With TUNNELLING, cached DNS requests by the client’s operating system or browser could lead to errors. Therefore, the best way to deal with a captive portal is to use SPOOFING or to connect with a browser, use one of the provided HTTP links, and fill out the captive portal’s form immediately (because of possible timeouts).
- If this doesn’t work, go back to the dialogue window, and choose to go back to the TWM (starting with TorBox v.0.5.0). Because TorBox tries to flush the DHCP and get a new IP, you must press enter on the same or another wireless network in TWM to get a new, actualised IP address. Then repeat the process.
- Also, with TUNNELING: If you were able to submit all data on the captive portal’s form but didn’t receive any “success message”, then most probably, the captive portal was misconfigured, or there are some problems with the DNS resolution. Most likely, your authentication was successful. Go back to the TorBox dialogue and continue, which will deactivate the captive portal mode again. Don’t go back to the TWM. Instead, check the Tor log file with entry 4 in the main menu.
- If you overcome the captive portal but failed to reach a tor entry guard (usually, tor stocks between 0% and 10%), try the countermeasure against a tightly configured firewall option in the Countermeasure sub-menu (starting with TorBox v.0.5.0) or use bridges.
- To be clear: most of these problems also confront other devices, not only the TorBox. You could check the captive portal with another device and use SPOOFING.