We are very dependent on your feedback! In this release, we have made an effort to implement your requests and improve the usability of TorBox based on your feedback.
If you download the new TorBox image or install it with our TorBox installer, it is important to notice that for security reasons, we locked/removed the user “pi”. To log into TorBox, you have to use the username: torbox / password: CHANGE-IT. Please, do not forget to change the default passwords as soon as possible (the associated entries are placed in the configuration sub-menu). Since we had to install additional software packages and update the configuration files, we recommend using the new image rather than updating an existing system. However, we have added a short guide at the end of this post for those who absolutely must update from the previous version (not older!).
TorBox Image (about 1.2 GB): v.0.3.2 (24.08.2020) – SHA-256 values
27.08.2020: the image has been updated with Tor version 0.4.3.6
TorBox Menu only: v.0.3.2 (24.08.2020) – SHA-256 values
• • •
Changelog: v.0.3.1 (30.05.2020) –> v.0.3.2 (24.08.2020)
- Update: The system is based on Raspberry Pi OS “Buster” Lite with a Linux Kernel 5.4.51 and Tor version 0.4.3.6.
- New: Based on several user requests, TorBox supports now internet connectivity over a VPN. Nevertheless, we do NOT recommend using a VPN. If Tor entry guards cannot be reached for censorship reasons, we recommend using OBFS4 bridges. Nevertheless, we consider the additional risk of this “Tor over VPN” situation to be proportionate.
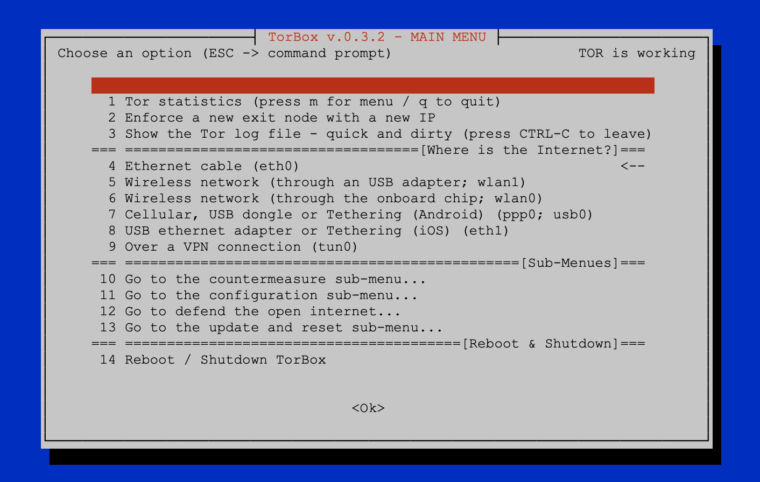
- New: Also, based on user requests, we added in the configuration sub-menu the possibility to deactivate the TorBox access point functionality. In other words: you can now disable TorBox’s WiFi, which only makes sense, and is only possible, with (a) cable-connected client(s).
- New: Based on another user request, we added a new SOCKS v5 port to support destination address stream isolation. It can be chosen, if the old port 9050 without stream isolation or the new port
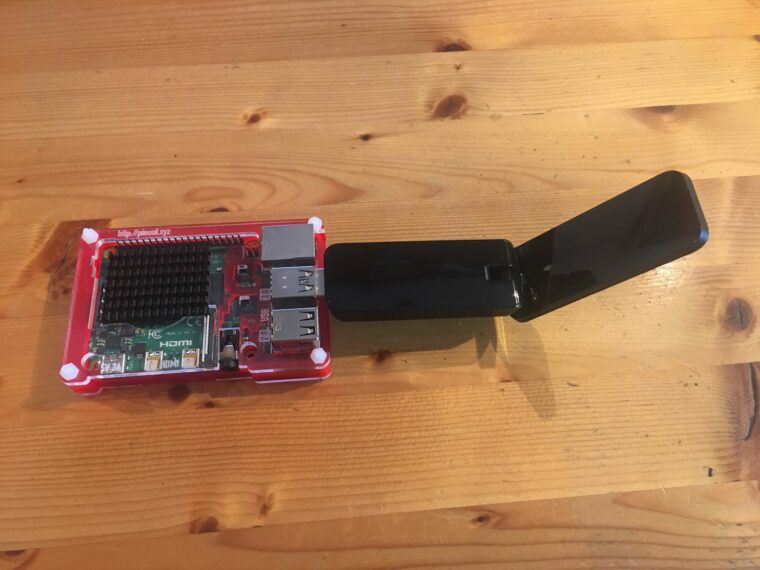
90519052 with stream isolation should be used. We consider the implementation as “experimental” because we are worried about a possible negative impact on performance when using stream isolation. We like to hear your feedback on your experiences about that feature so that we can decide if we go to enable it for the entire data streams, not only for that particular socket. - New: Support for 3.5“ no-name TFT displays. Please let us know if you wish to have support for additional displays.
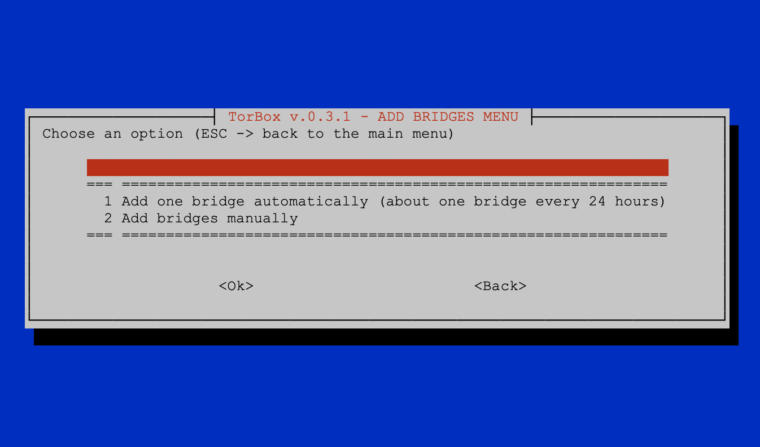
- New: A new feature enables the functionality to add a new OBFS4 bridge automatically. Because we do not want to overload the Tor Bridge database unnecessarily with requests, this function only returns one bridge every 24 hours.
- New: Slowly but steady, TorBox is becoming more system and hardware independent. For that reason, the login to administer the TorBox is new „torbox“ (with the default password „CHANGE-IT“). For security reasons, on the Raspberry Pi OS, the user „pi“ is locked (TorBox installer) or even removed (TorBox image).
- Improved: Based on several user feedback, we changed again how TorBox reconfigures its network settings. Honestly, the rewriting and fixing of the involved scripts was a real pain in the ass, and extremely time-consuming. Hopefully, the changes will smooth the user experience once more. Additionally, we also implemented a new failsafe mechanism, which should avoid lockout events. Before this update, that mechanism was implemented in the configuration script. Now, we moved it into the rc.local, so that TorBox can fix itself at startup.
- Improved: Also, based on user requests, we improved the way how the completion of the various operations in the update and reset sub-menu is communicated to the user. We also improved the way TorBox’s configuration files are being updated / reset. Finally, we added a time synchronization feature in the update and reset sub-menu under the entry 10 “Just fixing and cleaning”. In case of a time synchronization problem, just open the sub-menu, mark entry 10 with the space key, and press “Enter” to fix it.
- Improved: We also improved the DHCP server capabilities, which should minimize cases in which TorBox has to be restarted when switching from one connectivity setting to another.
- Improved: To make TorBox more hardware and system independent, we modified how the user password get changed.
- Improved: The indicators in the configuration sub-menu are now updated after each change. This prevents incorrect entries after changing the configuration.
- Improved: The reboot and shutdown functions have been combined in one single menu entry to save space on the main menu.
- Improved: The installation scripts.
- Fixed: There was an error in the Internet indicator. When wlan1 was chosen as a source, the indicator was set to eth1 and vice versa.
- Fixed: There was another error in the INTERNET <-> WLAN0 <-> ETH0 <-> CLIENT configuration, which could prevent a trouble-free operation.
- Fixed: We forgot to update the package lists before we started to update to the newest version of Tor in the update and reset sub-menu. That was not very smart and, finally, broke the update functionality. We also forgot to inform the user to which version we would update Tor, which gave the whole operation a “Russian roulette” feeling. We now also check if we could successfully download the Tor source files and display a message if something went wrong. Moreover, because of a typo, the folder “~/debian-packages” was not removed after the operation.
- Fixed: By choosing iOS Tethering or an USB adapter using the eth1 interface (main menu entry 8), a wrong info-screen was displayed.
- Fixed: We switched from “service rsyslog stop” to “systemctl stop rsyslog” to change logging from high to low in the configuration sub-menu. The former worked under Raspberry Pi OS, but not under Ubuntu.
- Fixed: An error in the installation script for the Raspberry Pi OS prevented to set the hostname to TorBox031. Because we use the installation script to build our image, this error was also on the image.
- Experimental: A new installation script for installing TorBox on a hardware-independent Ubuntu-system (Ubuntu 20.04 LTS 32/64 Bit) is available.
How to update from TorBox v.0.3.1 (30.05.2020)?
To update a TorBox v.0.3.1 (30.05.2020) installation, you can perform the following tasks. This deletes all your custom made configuration, but not alter your bridge relay keys. Nevertheless, we recommend, if possible, to use the new image.
- Please, make sure that TorBox has Internet connectivity.
- Update the system: Go to the TorBox update and reset sub-menu (main menu entry 12) and update the base system and also the TorBox menu (entry 1 and 4). This will update TorBox’s packages and the Linux kernel to version 5.4.51.
- To ensure that all necessary packages are installed, execute the following commands (please, make sure that you copy the entire line!):
sudo apt-get -y update
sudo apt-get -y install hostapd isc-dhcp-server obfs4proxy usbmuxd wicd-curses dnsmasq dnsutils tcpdump iftop vnstat links2 debian-goodies apt-transport-https dirmngr python3-setuptools python3-pip python3-pil imagemagick tesseract-ocr ntpdate screen nyx git openvpn
sudo pip3 install pytesseract
sudo pip3 install mechanize
- Replace the changed configuration files:
sudo cp etc/tor/torrc /etc/tor/
sudo cp etc/dhcp/dhcpd.conf /etc/dhcp/
sudo cp etc/rc.local /etc/
The three commands above should work. Alternatively, you could also go to the TorBox update and reset sub-menu (main menu entry 12) and reset the entire TorBox configuration from there (entry 6).
- Restart TorBox
Your feedback is welcome!!
We hope this version pleases you. However, we are dependent on feedback. It is not just about fixing bugs and improving usability, but also about supporting additional interfaces and hardware in future releases:
- What do you like?
- What should be improved (and how)?
- What would you like to see next? Which features do you request?
Known problems and bugs
- BUG – Entry 1 and 3 in the update and reset sub-menu should display the version of the installed Kernel, Tor, and Wicd. At the place of the wicd version, the following message is displayed:
ERROR: wicd-curses was denied access to the wicd daemon: please check that your user is in the "^[[1;34mnetdev^[[0m" group. This bug has no consequences on the update procedure, but can be easily fixed with the following command at the command prompt:sudo adduser torbox netdev. To take effect, you have to reboot the TorBox. The installation scripts are already fixed – the current image is updated. BUG FIXED ✔︎ - BUG – Additionally to the bug above, entry 3 in the update and reset sub-menu does not display the correct version of the newly available Tor version. This bug has no consequences on the update procedure. We fixed the script, which can be updated with the entry 4 in the update and reset sub-menu. The current image is updated. BUG FIXED ✔︎
- BUG -Another little bug (actually, it was only a typo), prevented installing the newly available self-compiled Tor version (menu entry 3). We fixed the script, which can be updated with the entry 4 in the update and reset sub-menu. The current image is updated. BUG FIXED ✔︎
- BUG – The Adafruit’s PiTFT installer script (entry 12 in the configuration sub-menu) aborts because it tries to work with the
/home/pi directory, which does not exist anymore. We fixed the script, which can be updated with the entry 4 in the update and reset sub-menu. The current image is updated. BUG FIXED ✔︎ - BUG – We discovered in the script, which is responsible for restoring the bridge relay configuration an error, which, in some situations, prevent the restoring of the values in the torrc file. We fixed the script, which can be updated with the entry 4 in the update and reset sub-menu. The current image is updated. BUG FIXED ✔︎
- PROBLEM – Even if there is a *.ovpn file in the ~/openvpn directory and openvpn seems to run, TorBox still reports that there is neither a connection to a VPN nor a *.ovpn file available. Various factors are responsible for this:
.- Currently, TorBox supports only tun0 as a valid VPN interface. Some VPN provider uses tun1, tun2, tun3, et.c in their *.ovpn files, which can be easily fixed. We modified the script, which checks the *.ovpn file and changes tun* to tun0. The fact that we only support tun0 is already mentioned in the respective information displays, but the wording has been adjusted slightly. The responsible script can be updated with the entry 4 in the update and reset sub-menu. The current image is updated. PROBLEM SOLVED ✔︎
- Additionally, it seems that our time-out of 10 seconds for establishing a VPN connection was a little bit optimistic. Therefore we increased the time-out to 15 seconds. The responsible script can be updated with the entry 4 in the update and reset sub-menu. The current image is updated. PROBLEM SOLVED ✔︎
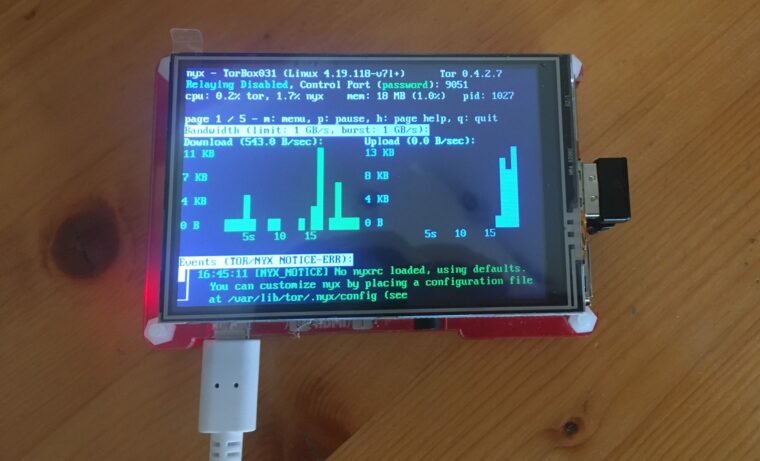
- OPEN ISSUE – Why is Tor version 0.4.2.7 installed and not the newer stable version 0.4.2.8 / 0.4.3.6? For the Raspberry Pi OS, only Tor version 0.4.2.7 is available. However, after an updated TorBox menu (entry 4 in the update and reset sub-menu), Tor version 0.4.3.6 can be installed with entry 3 in the update and reset sub-menu. As of August 27, the available image file includes Tor version 0.4.3.6. We also installed the tor-geoipdb package. ISSUE CLOSED✔︎