
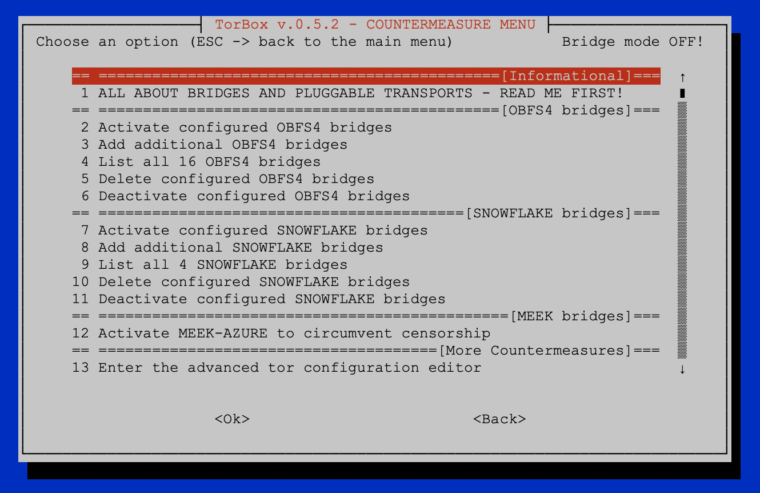
The primary purpose of the Countermeasure sub-menu is to offer a simple way of using OBFS4, Snowflake, and Meek-Azure bridges. Bridges circumvent censorship, e.g., on networks where Tor guard nodes and Tor connection handshakes are blocked. Thus, they are providing an entry to the Tor network. Additionally, the implementation of pluggable transports theoretically makes it possible to disguise Tor traffic in such a way that an ISP, network, government, or other censors cannot detect the use of Tor. The traffic then looks like http or another protocol. However, because, in general, using bridges lowers the network speed, it is best only to use them if necessary. Meek-Azure and Snowflake are probably slower than OBFS4, why it is preferable to try first OBFS4 before activating Snowflake or Meek-Azure.
- OBFS4 makes Tor traffic look random. Activating OBFS4 bridges can be problematic behind a tightly configured firewall (see more here). Usually, OBFS4 works well in countries with moderate Internet censorship.
- Snowflake is an improvement upon Flashproxy. It sends your traffic through WebRTC, a peer-to-peer protocol with built-in NAT punching. Usually, Snowflake is more effective in China, Iran, Russia or Turkmenistan (see also here).
- Meek uses a technique called “domain fronting” to send a message to a Tor relay in a way that is hard to block. Meek-Azure makes it look like you are browsing to Microsoft’s Azure server instead of using Tor.
After installing TorBox either, by using the image file and the corresponding start-up instruction or by running our installation script, OBFS4 bridges, Snowflake and Meek-Azure are already configured and can be activated with the first start-up of TorBox or later by using the Countermeasure menu entries 2, 7, or 12. However, only one of these pluggable transports can be activated at once.
In the following, we look at all menu entries one by one:
- Menu entry 1: All about bridges and pluggable transports – read me first: This brief introduction is intended to help new users, in particular, to understand and simplify the use of tor bridges and pluggable transports.
- Menu entry 2: Activate configured OBFS4 bridges to circumvent censorship: Use that menu entry to start the OBFS4 bridge mode. Unlike Snowflake and Meek-Azure, OBFS4 supports the use of several different bridges, which makes your connection more stable. With this menu, you can activate all OBFS4 bridges, only the ones, which are online, or you can specifically select bridges to be activated.
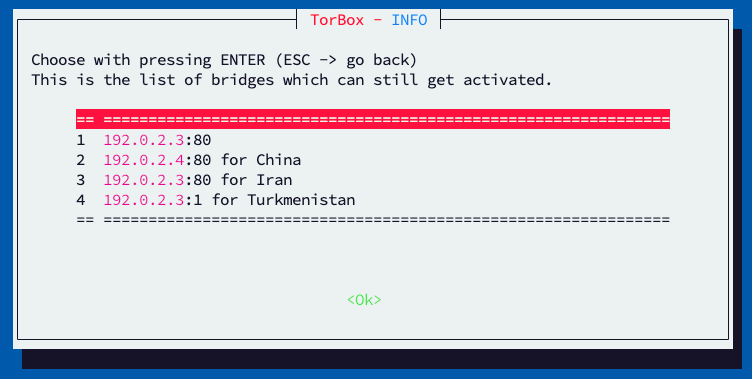
- Menu entry 3: Add additional OBFS4 bridges: OBFS4 bridges can either added automatically or manually. If manually added, the input box takes only one bridge address at a time. In other words: if you want to add three bridges, then the input box appears three times. If you’re going to add several bridges at once, then select menu entry 13. Apart from the automatic method, you have other ways to obtain OBFS4 bridges:
- Direct from the Tor Bridge database (chose “Advanced Options”, “obfs4” and press “Get Bridges”).
- Via email to [email protected], using an address from Gmail or Riseup with “get transport obfs4” in the body of the mail.
- Via Telegram (official): https://t.me/GetBridgesBot ; then use /bridges to get a bridge.
- (Not recommended, only if needed): Via Telegram (unofficial): https://t.me/tor_bridges
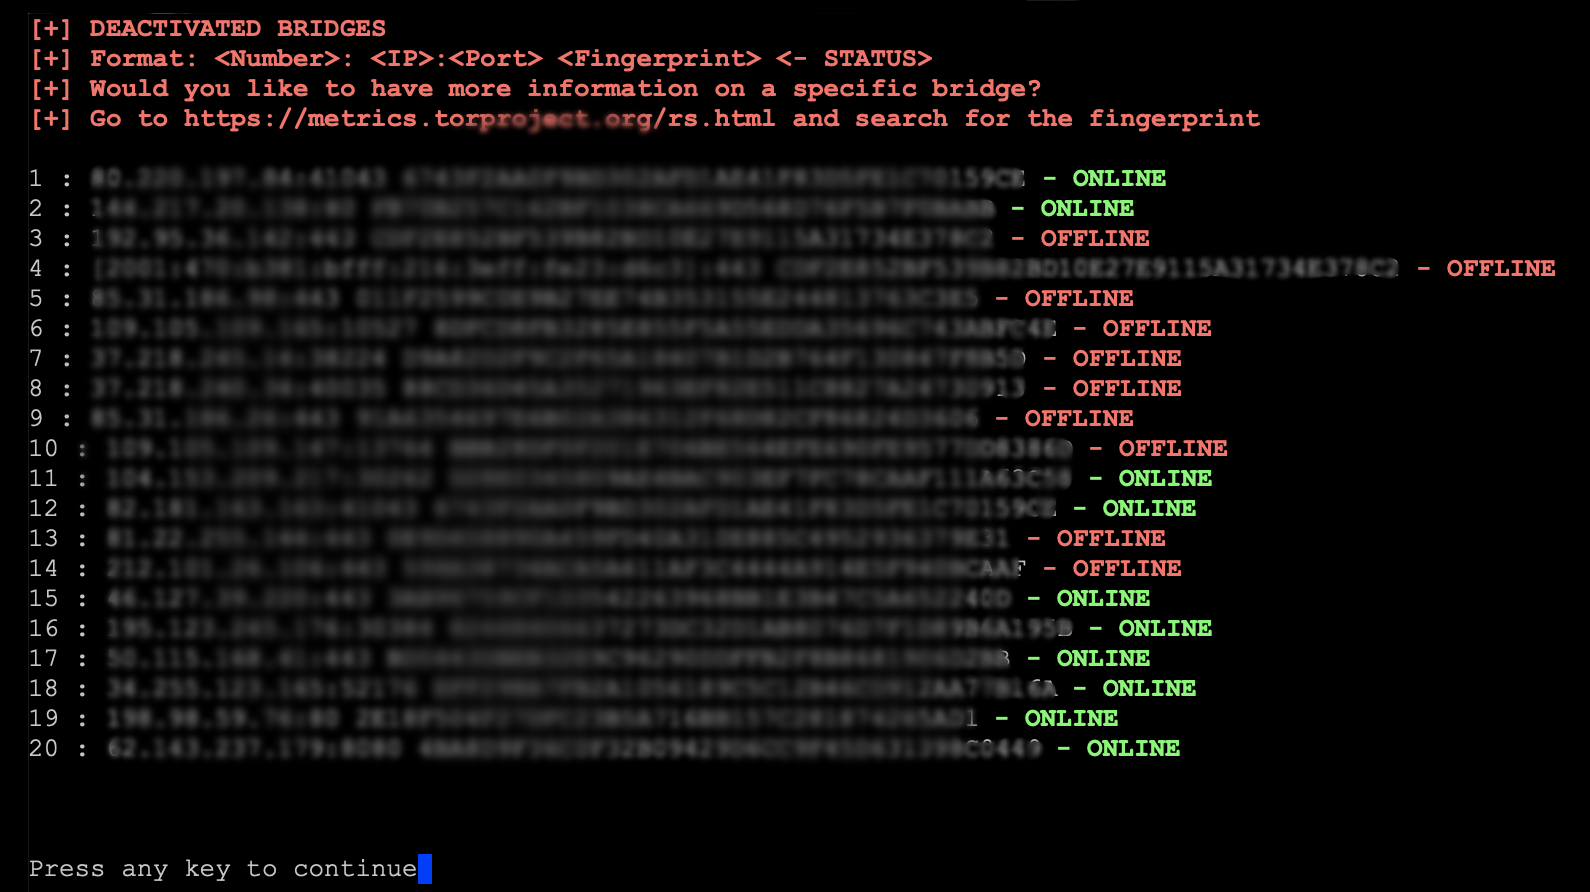
- Menu entry 4: List all xy OBFS4 bridges: This menu entry will list all already configured OBFS4 bridges and show the bridge’s state (online, offline, or doesn’t exist). However, the status of the OBFS4 bridge can only be shown if Tor’s bridge database can be reached. Each line is one OBFS4 bridge listed as Number: IP:Port Fingerprint – Status (name, certificate, packet size, and timing obfuscation are not shown). You can look up more details using the Relay Search Tool on the Tor Metrics with the bridge’s fingerprint.

.
- Menu entry 5: Delete configured OBFS4 bridges: OBFS4 bridges can be removed all, only the ones that don’t exist anymore or selected ones. After removing all bridges, the OBFS4 mode will automatically be deactivated, and TorBox will try to reach the Tor network directly through the Internet, which is the default. However, deactivating the OBFS4 mode by removing all OBFS4 bridges is unnecessary – just deactivate them (menu entry 6).
.
- Menu entry 6: Deactivate configured OBFS4 bridges: Use that menu entry to deactivate OBFS4 bridges. With choosing to deactivate all OBFS4 bridges, the OBFS4 mode will also be automatically deactivated, and TorBox will try to reach the Tor network directly through the Internet, which is the default. Alternatively, you can also only deactivate bridges that are offline or specifically select bridges to be deactivated. In this case, the OBFS4 mode will still be activated until all OBFS4 bridges are deactivated.
.
- Menu entry 7: Activate configured SNOWFLAKE bridges to circumvent censorship: Use that menu entry to start the SNOWFLAKE bridge mode. Currently, Snowflake supports only one bridge line. Only the first one will be used if you select several bridge lines in torrc.
Important: The OFFLINE/ONLINE status of Snowflake- and Meek-Bridges is always labeled as OFFLINE in the bridge database. Therefore, the status is not displayed in the list of Snowflake bridges.
Please be patient! It can take up to 5 minutes until TorBox is again ready to relay the data stream of your clients through the tor network – until then, the clients will be offline. Usually, any error messages can be ignored, just wait! You should see “Bootstrapped 100%: Done” at the end. Press q to leave the log. Tor Statistics (and probably some other tools) will not work under Snowflake.
- Menu entry 8: Add additional SNOWFLAKE bridges: SNOWFLAKE bridges can either added automatically or manually. If manually added, the input box takes only one bridge address at a time.
- Menu entry 9: List all xy SNOWFLAKE bridges: This menu entry will list all already configured SNOWFLAKE bridges. Each line is one SNOWFLAKE bridge listed as Number: IP:Port Fingerprint (name and other advanced information are not shown). You can look up more details using the Relay Search Tool on the Tor Metrics with the bridge’s fingerprint.
Important: The OFFLINE/ONLINE status of Snowflake- and Meek-Bridges is always labeled as OFFLINE in the bridge database. Therefore, the status is not displayed in the list of Snowflake bridges.
- Menu entry 10: Delete configured SNOWFLAKE bridges: SNOWFLAKE bridges can be removed all, only the ones that don’t exist anymore or selected ones. After removing all bridges, the SNOWFLAKE mode will automatically be deactivated, and TorBox will try to reach the Tor network directly through the Internet, which is the default. However, deactivating the SNOWFLAKE mode by removing all SNOWFLAKE bridges is unnecessary – just deactivate them (menu entry 11).
- Menu entry 11: Deactivate configured SNOWFLAKE bridges: Use that menu entry to deactivate SNOWFLAKE.
- Menu entry 12: Activate/Deactivate MEEK-AZURE to circumvent censorship: Use that menu entry to start the SNOWFLAKE bridge mode.
Please be patient! It can take up to 5 minutes until TorBox is again ready to relay the data stream of your clients through the tor network – until then, the clients will be offline. Usually, any error messages can be ignored, just wait! You should see “Bootstrapped 100%: Done” at the end. Press q to leave the log. Tor Statistics (and probably some other tools) will not work under Meek-Azure.
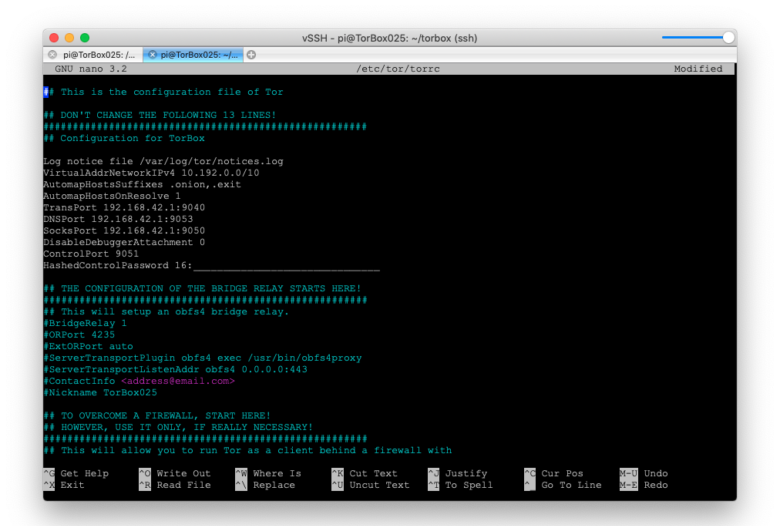
- Menu entry 13: Enter the advanced configuration editor: This menu entry gives access to the Tor configuration file. You should know what you are doing before you change anything in the configuration file — here, you can break your TorBox. If you are unsure, then contact us. Did you something wrong? You can always overwrite this configuration with the default one, stored in ~/torbox/etc/tor/. After changing the configuration, use the following commands in the editor: CTRL-S to save the changes. CTRL-X to exit the editor.
- Menu entry 14: Activate/Deactivate TorBox’s automatic counteractions (TACA): TACA avoids downtime and improve user experience with lower bandwidth.
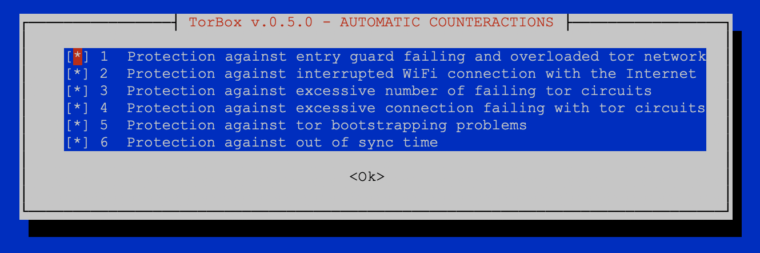
Currently, TACA handles six situations (see image above):
- Protection against entry guard failing and overloaded tor network: This will automatically switch to a new entry guard if the current one is reporting that it is failing or potentially overloaded.
- Protection against interrupted wifi (wlan0/wlan1) connection with the Internet: If TorBox loses the connection to the wifi (interface wlan0 or wlan1), it tries to automatically reconnect to the best available wifi, which the user was connected to before (passwords are automatically stored and handled by
wpa_supplicant). In places with several weak wifi’s, it is recommended to log into all of them by using Torbox’s Wireless Manager so that TACA can switch from one to another if necessary. - Protection against an excessive number of failing tor circuits (25 failures in 2 minutes): This will restart tor. However, if connected to a wifi (interface wlan0 or wlan1), it will additionally try to reconnect to the best available wifi (see point 2).
- Protection against excessive connection failing with tor circuits (40 failures in 2 minutes): This will restart tor. However, if connected to a wifi (interface wlan0 or wlan1), it will additionally try to reconnect to the best available wifi (see point 2).
- Protection against tor bootstrapping problems (25 failures in 2 minutes): Because there are several causes of a bootstrapping problem, if connected to a wifi (interface wlan0 or wlan1), TACA will try to reconnect to the best available wifi first (see point 2). Additionally, the tor configuration is flushed.
- Protection against out of sync time: If TACA detects an out of sync system time, it re-synchronize the system time with ntpdate.
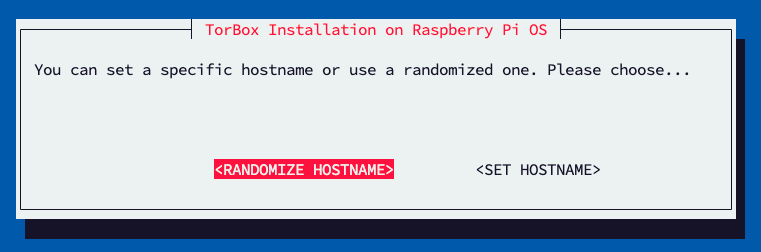
- Menu entry 15: Change or randomize TorBox’s hostname: At the beginning of 2023, some users in highly authoritarian countries reported that clients with the hostname TorBox were blocked from accessing the Internet. This menu entry gives the possibility to change or randomize TorBox’s hostname.
- Menu entry 16: Countermeasure against a tightly configured firewall: Since 2021, the TorBox team observed more and more providers (especially in connection with open hotspots) blocking ports needed for tor to work properly (tor commonly uses ports 80, 443, 9001 and 9030 for network traffic and directory information). If activated, this entry takes care that tor uses only ports 80 and 443 for its data stream. This feature is activated by default. However, don’t use it if you plan to use bridges or to run an OBFS4 bridge relay!
- Menu entry 17: Countermeasure against a disconnection when idle feature: Certain Internet providers (usually at airports, in hotels, coffee houses, etc.) disconnect the network connection after a particular time of inactivity. In this case, the Tor statistics (main menu entry 1) no longer shows any data transfer. Usually, after about 15 seconds, errors in communication with the Tor network appear. This menu entry activates/deactivates a recurring Ping to google.com to prevent disconnection by an Internet provider with an activated “disconnect when idle feature”.
.
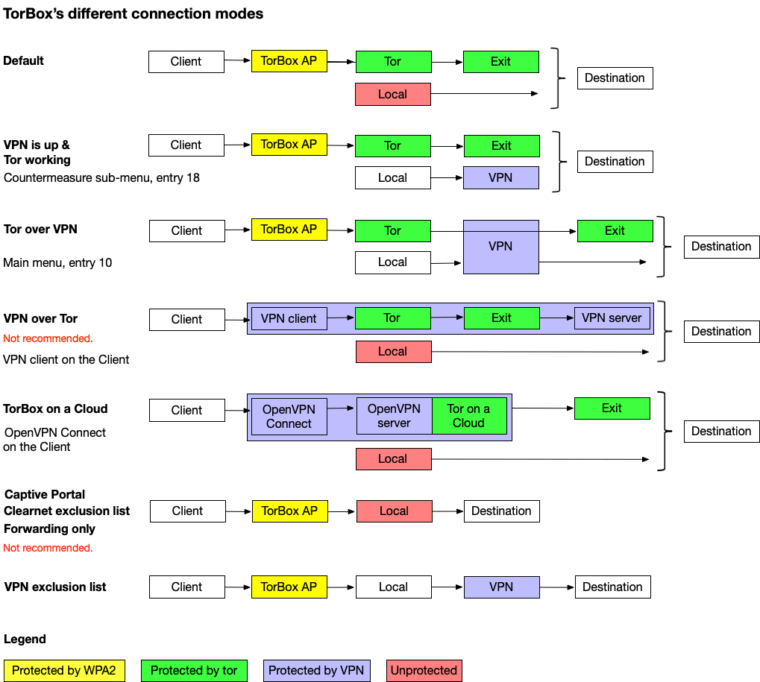
- Menu entry 18: Connect/Disconnect TorBox to/from a VPN: This menu entry will connect the TorBox to a VPN so that the local network data from the command prompt is routed through the VPN. However, this menu entry will not restart Tor, and your client network data will still be routed directly through Tor using the interface highlighted in the main menu. This is useful if your ISP censors the network traffic so that TorBox cannot update Tor or TorBox. If you want to route Tor through VPN, please, use entry 9 in the main menu.
Before using this menu entry, please ensure that one or more *.ovpn – files are in the ~/openvpn directory so that TorBox can execute OpenVPN with that file.
Using that menu entry again deactivates the VPN connection, and the local network data from the command prompt is routed through your Internet provider without a VPN (default). However, this menu entry will not restart. Client network data will always be routed through Tor.
.
• • •
Problems and questions
- Can I use TorBox and VPN together? –> see here.
- Can Tor protect me against tracking and/or fingerprinting in webbrowser to guaranty my anonymity accessing a website? –> see here.
- I’m connected to a public wireless network; everything works as expected. However, every x minutes, the connection to the wireless network stops completely, and I have to repeat the entire login procedure. What could be the reason? –> see here.
- Is it possible to activate an OBFS4 bridge relay and simultaneously use OBFS4 bridges on the same TorBox? –> see here.
- Is it possible to activate an OBFS4 bridge relay and simultaneously use the countermeasure against tightly configured firewalls? –> see here.
- Is it possible to use bridges and simultaneously the countermeasure against tightly configured firewalls? –> see here.
- I set up an Onion Service and want to share a folder with or without client authorization, but the TorBrowser on another system shows only errors that it cannot connect to the Onion Service. What is wrong here? –> see here.
- Is there a way to force / block TorBox to use an exit node in a specific country? –> see here.
- My TorBox is connected to a captive portal (used in airports, hotels, coffee houses etc.) and cannot connect to bridges. What’s wrong? –> see here.
- Ok, I’m using bridges so that the Tor Browser / Tails is running behind TorBox. However, isn’t that a risk for my security/anonymity (“Tor over Tor” scenario)? –> see here.
- Why is the local TorBox traffic not routed through tor? Why is by default Google’s and/or Cloudflare’s service used to circumvent cheap censorship measures or to test the connectivity? Can I change Google and / or Cloudflare services with something else? –> see here.
- Why is tor so slow – is the tor network broken? –> see here.