Sometimes, it needs a little bit more time, but we are trying as well as possible to improve TorBox based on the user’s feedback. For some time now, we have received requests like these:
It would be great if there is a vpn option […]. The goal is to remote access torbox from anywhere and go in tor network.
Is it possible to set up a vpn server on the same RPI3 to connect to it from outside and be redirected to tor by TorBox?
In preparation for TorBox version 0.5.4, we integrated VPN server capability in a separate development branch and, with it, the possibility of running TorBox on a cloud. We tested this new feature extensively on Debian-based systems, but we would like to hear about your experience with it. Your feedback is essential for us to improve TorBox, fix bugs, and work on features that matter to you. Below, we are going through all the steps of how to test the VPN server capabilities and how to install TorBox on the cloud.
• • •
Add VPN server capability on an already existing TorBox installation
First, install lshw. It is a small tool to provide detailed information on the machine’s hardware configuration. The idea behind implementing this tool is to more reliably detect if specific hardware (for example, wireless capabilities) is present to inform if particular entries in the TorBox menu can be used.
sudo apt-get install lshw
Second, you have to edit TorBox’s run-file (sudo nano ~/torbox/run/torbox.run) and add the following entry: OPENVPN_FROM_INTERNET=1 somewhere in the middle of the file.
On the TorBox, go to the Update and Maintenance sub-menu and use entry 5 to update the TorBox menu. Choose the “Expert” mode and change the branche from master to torbox_v054 (don’t change the fork).
Subsequently, the tor configuration file has to be replaced. It may be advisable to make a backup of your old configuration file because with the new one, all your changes will be lost:
cd
sudo cp /etc/tor/torrc /etc/tor/torrc.bak
sudo cp torbox/etc/tor/torrc /etc/tor/
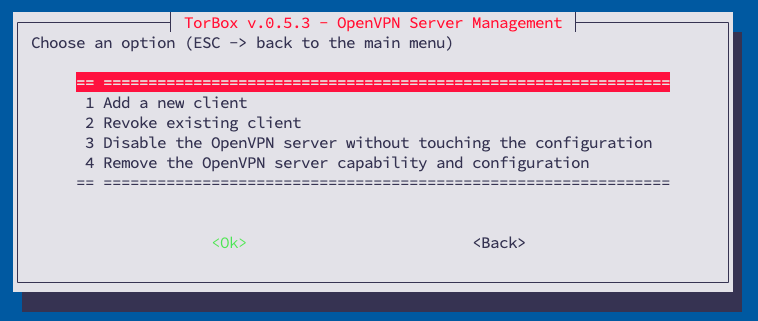
Go to TorBox’s main menu and choose the Internet source. It will correctly reconfigure TorBox. Now, in the Configuration sub-menu, you should see a new entry: 20 Install the OpenVPN server. The OpenVPN server will be easily installed and configured by choosing this menu entry. Also, an ovpn file will be created in the TorBox’s home directory, which you can download on your client. After installing OpenVPN Connect on the client, it can be connected with your TorBox via VPN, and all the data traffic will be routed via VPN tunnel to your VPN server, which will route the traffic through the tor network. You can even give additional ovpn files to others, who can use your TorBox, but cannot log into it as long as he doesn’t have the necessary passwords and/or ssh keys. However, every client has to have its ovpn file. Once installed, you can use again entry 20 in the Configuration sub-menu, which will show you the following sub-menu:
• • •
Install and run TorBox on a cloud
Although the available TorBox image is based on Raspberry Pi OS “Bookworm” lite 64-bit and has to be run on a Raspberry Pi 3 Model B+, a Raspberry Pi 4 Model B, or a Raspberry Pi 5, the installation scripts support besides the Raspberry Pi OS also Debian and Ubuntu Server. With TorBox version 0.5.4, all installation scripts will also support the installation of TorBox on a cloud, but you can already test it.
You can find inspiration here if you don’t already have a virtual server (cloud). Probably the most low-priced possibility is to use a virtual private server (VPS) running Debian (recommended) or Ubuntu Server on it. Following, we explain how to install TorBox on a cloud using the Debian installation script (the Ubuntu installation script can be used accordingly).
IMPORTANT: THE USE OF THE INSTALLATION SCRIPT WILL CHANGE THE ENTIRE CONFIGURATION AND MAY EVEN WIPE YOUR EXISTING INSTALLATION
Use the installation scripts only on a fresh and unused installation.
Under Debian, log into your server as root. With Ubuntu, log into your server as a user (for example, ubuntu or create the user torbox). Then download and start the installation script:
cd
wget https://raw.githubusercontent.com/radio24/TorBox/torbox_v054/install/<script>
chmod a+x <script>
./<script> --select-branch torbox_v054 --on_a_cloud --step_by_step
Use run_install_on_debian.sh or run_install_on_ubuntu.sh depending on the Operation System on the server. The installation process runs almost without user interaction. However, macchanger will ask for enabling an automatic change of the MAC address – reply with NO! If you used the install script locally, via VNC, or an SSH client on a public IP, then you have to continue with the same method as user torbox for the first start-up dialogue after the reboot at the end of the installation. Next, the OpenVPN server will be installed and configured. Also, an ovpn file will be created in the TorBox’s home directory, which you can download on your client, later. After the installation, the first start-up dialogue continues with the configuration of the TorBox. TorBox will only connect to the tor network as in a standard installation after fulfilling the first start-up dialogue. We recommend selecting the Internet source if asked and not skipping this step.
After installing OpenVPN Connect on the client, it can connect the client with your TorBox via VPN. After this point, you can also use your web browser to reach the TorBox menu with the following address: http://192.168.44.1. As a reminder, using the web browser is only possible from a device using the local network (via OpenVPN connection) to connect with TorBox because the connection between the browser and TorBox is not encrypted.
After a successful connection, all data traffic from the client device will be routed via a VPN tunnel to your VPN server on the TorBox on a cloud, which will route the traffic through the Tor network. You can even give additional ovpn files to someone else, who can use your TorBox, but cannot log into it as long as he doesn’t have the necessary passwords and/or ssh keys. However, every client has to have their ovpn file. Once installed, you can use entry 20 in the Configuration sub-menu, which will show you the following sub-menu:
With “add new client” you can generate additional ovpn files for other client devices or users. To avoid collusion, every client device needs a separate ovpn file.
Security Settings
Even if the client is now routing the packages via the TorBox’s OpenVPN server through the tor network, you should take time to adjust some security settings. As in every other TorBox installation, you should immediately change the passwords in the Configuration sub-menu (check out the red marked menu entries here). If you want to reach the TorBox with a SSH client via Internet than we advice to generate a SSH key with entry 2 in the Configuration sub-menu, to download the private key to your client device, and after testing to disable the SSH password identification in the Danger Zone. Because connecting the TorBox from a client via OpenVPN is considered as coming from local network, you may completely disable SSH access from the Internet in the Configuration sub-menu.
In contrast to a local TorBox, to one on a cloud is exposing its SSH login to the Internet. For that reason it is a good idea to disable SSH access from the Internet in the Configuration Menu as soon as your OpenVPN client successfully connects to the TorBox on the cloud.
What can I do if the website doesn’t accept tor connections?
Theoretically, on a local TorBox with which WiFi connects the client device, tor can be temporarily bypassed by a local VPN client (VPN over Tor), which, however, cancels out any security and anonymity advantages Tor has to offer (see more here). With Tor on a cloud, that’s impossible, and unfortunately, the website is not reachable. However, there is the possibility of excluding specific domains from routing through tor by using entries 1-3 in the Danger Zone. As the name of the sub-menu already implies, this comes with risks.
Feedback is essential for us!
We are dependent on feedback. It is not just about fixing bugs and improving usability but also about supporting additional interfaces and hardware in future releases:
- What do you like?
- What should be improved (why and how)?
- What would you like to see next? Which features do you request?
With the TorBox GitHub repository, it is straightforward for everyone to report issues or change the code and propose it in a pull request. Because we continue to travel around, it sometimes needs more time to address the issues and proposals.

